Showing posts with label glitter. Show all posts

Wednesday, December 19, 2018

Sparkle N Sprinkle Puppy Love Valentine's Day card

Today's card is a card using Sparkle N Sprinkle's December release, called Puppy Love. It is such a sweet stamp set!! I used the digi stamp version , and I also die cut the card panel using the Swirling Frame Layering Tonic Die and some tear-ific tape and glitter. Let's check out this fun card.

Supply List:
Sparkle N Sprinkle Puppy Love digi stamp set [DIGI3146M]
Sparkle N Sprinkle Raspberry Soda glitter [G1052]
Sparkle N Sprinkle Tooth Fairy glitter [GM2036]
Sparkle N Sprinkle Frosted Carmine [GM2011]
Sparkle N Sprinkle Golden Wheat [GM2026]
Sparkle N Sprinkle Sparkling Snow [G1003]
Sparkle N Sprinkle 3/4" Tear-ific Tape [SAT05]
Sparkle N Sprinkle Mini Wobbler [AWS12]
Sparkle N Sprinkle Dimensional Glue [539]
Sparkle N Sprinkle Glitter Brush [SG1400]
Nuvo Smooth Precision Glue Pen [206N]
Nuvo Deluxe Adhesive [200N]
Nuvo Aqua Shimmer Glitter Gloss Pen [888N]
Tim Holtz Glass Media Mat [1914e]
Tonic 12" Advantage V Blade Trimmer [159e]
Tonic Swirling Fame Layering Die Set [1462e]
Tonic Tangerine machine [138e]


This puppy makes me so happy! I sized the digital image, using my computer in a word program. I sized the puppy, then sized the balloons and layered them behind the pup! This is one of the things I love most about digi stamps - you can make them any size you want and put anything in the foreground or background. So much fun! After everything was sized to what I wanted, I printed two copies of the image, onto white cardstock, using my color ink jet printer. I fussy cut out one of the pups. I rolled on some Nuvo Smooth Precision Glue Pen to the hearts on the pup's shirt, and sprinkled on Frosted Carmine glitter. I also drew a bit of glue pen onto the pup himself, and sprinkled on Golden Wheat glitter. I swiped some Nuvo Aqua Shimmer Glitter Gloss Pen onto his nose and eyes, and then covered both with a squeeze of Sparkle N Sprinkle Dimensional Glue. I mounted this pup onto a Mini Action Wobbler and adhered it onto the card panel.

For the big heart, I had also sized the sentiment onto the balloon heart. I squeezed on some Dimensional Glue onto the exclamation point, and sprinkled on Sparkling Snow glitter. I rolled on more Nuvo Smooth Precision Glue Pen onto the heart for some accents, and sprinkled on Tooth Fairy glitter. This gave the heart a little extra pop!

I also decorated the image. I die cut it with Tonic's Swirling Frame Layering Die Set and then layered some 3/4" Tear-ific Tape behind the edge. I pressed Raspberry Soda glitter into the tear-ific tape which adhered to the adhesive that appeared through the frame edge. I burnished in the glitter with my finger tool and then dusted off the unadhered glitter with my Glitter Brush. This really made the white cardstock pop too, and is such a fun and easy way to add a lot of sparkle to the card! I layered this over a pink cardstock and fussy cut it to have the pink just peek out of the edges. I layered all of this over a black card base.


This was a really fun and easy card to make. Those digi stamps really make it easy - and I used the pre-colored digi image as well, so I didn't have to spend any time coloring, I just got to decorate and have fun! I know you will love this sweet Puppy Love stamp set. You gotta get it - perfect for our upcoming Valentine's Day!


And, this is my last post for Sparkle N Sprinkle. It has been an absolute pleasure and honor being on this company's Design Team since 2015. I cherish the memories I made with these amazing gals. I miss you all, already!

Thanks for stopping by. Have a magical day!

-Chris

Sparkle N Sprinkle compensated links are used when possible.
This blog post first appeared on Sparkle N Sprinkle's blog.

Wednesday, December 12, 2018

Sparkle N Sprinkle Violets For You Shaker Ornament

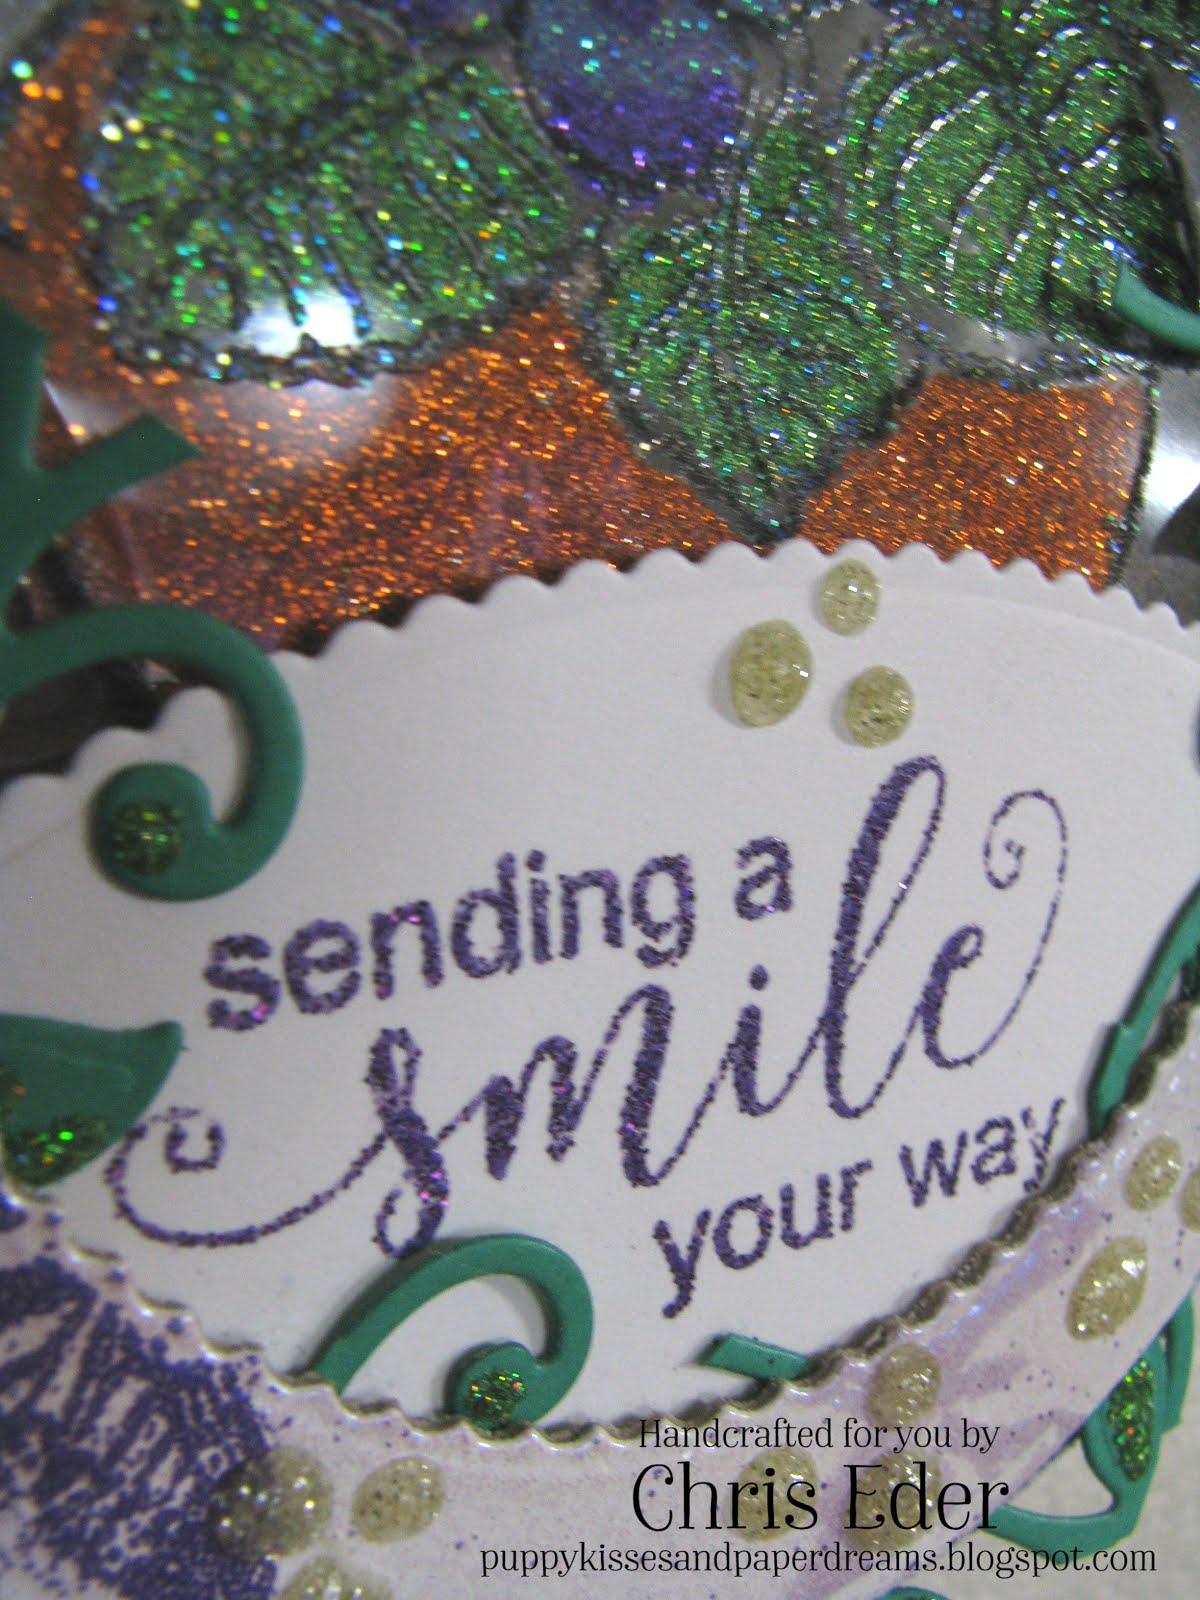
Today's project is a shaker ornament, using the new Violets For You, one of the stamps in Sparkle N Sprinkle's December release. This stamp set has a gorgeous image of a violet plant in a pot, a stand alone violet and leaves, and a sweet butterfly. Let's check out what I made, using this gorgeous stamp set!

Supply List:
Sparkle N Sprinkle products:
Violets for You stamp set [00-925P5]
Sparkle [EP107]
Amethyst [EP199]
Royal Purple [EP275]
White Detail [EP298]
Super Thick White [EP355]
Wisteria [EP358]
Tiger Orange [GM2003]
Peruvian Lily [GM2014]
Gecko [GM2045]
Purple Fig [GM2047]
Caspia Sea [GM2048]
Butterscotch [GM2051]
Clear Embossable Acetate [99602]
Anti Static Bag [99512]
3/4" Tearific Tape [SAT05]
Brushable Glue [540]
Glitter Brush [SG1400]

Other products:
Tim Holtz Media Tool Set [2124e]
Tim Holtz Glass Mat [1914e]
Tonic 12" Advantage V Blade Trimmer [159e]
Tonic Tangerine [138e]
Tonic Clematis Vine Simply Screens [1047e]
Tonic Mixed Edge Oval Layering Basics Die Set [1456e]
Nuvo Gold Coast Glitter Drops [770N]
Nuvo Deluxe Adhesive [200N]
Nuvo Smooth Precision Glue Pen [206N]
Hai Round Embossed Sequins [Q6-001]
Hai Rainbow Rhinestones [SEQM-015]
Hai Diamonds Sequins 3mm [Q3-006]
Versamark ink [VM-001]
Versafine Black Onyx ink [VF-82]


I stamped the image onto Embossable Acetate. I used my Tim Holtz Stamp Platform. I treated the acetate with my Anti Static Bag and inked up my stamp with Versafine Black Onyx ink. I stamped the image onto the acetate, sprinkled on Sparkle embossing powder and heat set it. The Sparkle embossing powder is clear with sparkly glitter. It is so much fun, and packs an extra punch from just Clear embossing powder. I use it a lot! After stamping and heat embossing, I turned my stamped acetate over, and painted on some Brushable Glue to the backside of the stamped image. I brushed glue on the leaves area, then sprinkled on Gecko glitter. After it dried, I brushed on Brushable Glue to the violets. I brushed the "inside" of the petals and sprinkled on Caspia Sea glitter. Then, I did the outer edges of the violets by brushing on more glue and sprinkling on Purple Fig glitter. I  used Butterscotch glitter for the inner part of the flowers. For the pot, I sprinkled on Peruvian Lily and Tiger Orange. The sentiment was heat embossed with Royal Purple, after treating some cardstock with the Anti Static Bag, and stamping it with Versamark ink.

I created a shaker by die cutting ovals using the Mixed Edge Oval Layering Basics Die set from Tonic, using fun foam. I layered these ovals together to create the "height" for the shaker. I die cut an oval from cardstock (without the "inner" part cut out) and used it for the back of the shaker. I layered the oval fun foam and adhered them together with Nuvo Deluxe Adhesive. For the top layer, I die cut another oval, with the "inner" part cut out, from chipboard. I inked up the chipboard with Versamark Ink, and sprinkled on White Detail embossing powder and heat set it. I did this several times to get a solid coat over the chipboard. Then, I stamped the butterfly with Versamark Ink all around the oval frame, and sprinkled on Wisteria and Amethyst embossing powders to create lots of butterfly images on the frame. I sprinkled on some Super Thick White in random places and heat embossed it. I did this just to give some extra depth to the images and background. I also stamped out some butterflies on patterned paper and heat embossed them with the Wisteria and Amethyst embossing powders. I fussy cut those and layered them around the frame too. I used an assortment of HAI sequins for the shaker bits. This photo shows several of them.

Here is another view of the ornament. When I finished it, I squeezed on some Nuvo Gold Coast Glitter Drops. And, as I finished off the ornament, I thought I needed something a bit more. So, I die cut some green cardstock using the Clematis Vine Simply Screen. I rolled on some Nuvo Smooth Precision Glue Pen and sprinkled on some Gecko glitter. I layered these vines under the frame to give the ornament some extra flair.

I really like that this beautiful stamp set can be used in many ways, including making an ornament or wall hanging! I look forward to seeing what you create - make sure to enter your creations in the Sparkle N Sprinkle Creative Challenge, found both on our blog and on Facebook.

Thanks for stopping by. Have a magical day!

-Chris

Sparkle N Sprinkle compensated links are used when possible.
This blog post first appeared on Sparkle N Sprinkle's blog.

Sunday, December 2, 2018

Star Shaped Cards

I made these star-shaped cards, perfect for the current Lawn Fawnatics Challenge 41 - Shaped Cards. Let's check out these cards!


I used Lawn Fawn's Fairy Friends stamp set. I stamped the images with my Tim Holtz Stamp Platform, and Memento Tuxedo Black ink, a Copic friendly ink. I colored my images with Copic markers, and then put them back into the Stamp Platform, and stamped them again with Versafine Onyx Black. I sprinkled on Sparkle N Sprinkle's Sparkle embossing powder and heat set it. This is one of my favorite ways of being able to color with Copics with a Copic friendly ink, and then ending up with a good solid black outline that is embossed! The key is the stamp positioner. Over-stamping is a breeze! I squeezed on some Dries Clear glue to a few strategic locations, like the wings, and sprinkled on some Sparkling Snow glitter from Sparkle N Sprinkle. I die cut some stars using Lawn Fawn's Puffy Star Stackables dies, using my Tonic Tangerine.

I also die cut out some clouds using Lawn Fawn's Puffy Cloud Borders from vellum and cream cardstock. I layered these all up, and squeezed on some more adhesive and sprinkled more glitter.

And, I used my NEW "made by" stamp that I purchased from Bossy Joscie Crafty Goods. I LOVE it! She does custom and personalized stamps, and a lot of other great things! She also created an electronic image for me that are on each photo. Thank you so much Joscie!!

I think these sweet Star shaped cards are so cute, and will look good adoring the gifties.

Thanks for stopping by. Have a magical day!

-Chris

Sparkle N Sprinkle compensated links are used when possible.
This blog post first appeared on Sparkle N Sprinkle's blog.
Wednesday, November 21, 2018

Sparkle N Sprinkle Doctor at Heart card

Hi! Today's card is another new release from Sparkle N Sprinkle, for November. This one is so sweet, it is "Doctor at Heart" stamp set. I used the digi version, and I chose the pre-colored image which freed up my time to bling it up instead of doing a lot of coloring first. Let's peek at this card!

Supply List:
Sparkle N Sprinkle Doctor at Heart digi stamp set [DIGI3152J]
Sparkle N Sprinkle Sapphire embossing powder [EP185]
Sparkle N Sprinkle Super Thick Silver embossing powder [EP467]
Sparkle N Sprinkle Rapture Blue glitter [G1078]
Sparkle N Sprinkle Gypsy Red glitter [GM2005]
Sparkle N Sprinkle Butterscotch glitter [GM2051]
Sparkle N Sprinkle Sunset glitter [G1040]
Sparkle N Sprinkle Sticker Paper [99558]
Sparkle N Sprinkle Glitter Brush [SG1400]
Nuvo Clear Mark Embossing Pen [103N]
Nuvo Deluxe Adhesive [200N]
Nuvo Smooth Precision Glue Pen [206N]
Nuvo Custard Cream embellishment mousse [827N]
Nuvo Pacific Teal embellishment mousse [822N]
Nuvo Nebula Blue Mica Mist [576N]
Nuvo White Blizzard Glitter Drops [758N]
Tonic Tangerine machine [138e]
Tonic Archway Stripe Invite Insert Die Set [1504e]
Tonic Verdi's Wave Flourish Die Set [1760e]
Tonic Easy Clean Craft Mat [1514e]


I sized the digital image on my computer, and then printed it with my color printer. I die cut the image with a banner die. I also blended on some blue distress ink to the edges. I then swiped the Nuvo Clear Mark embossing pen along the outer edge, sprinkled on Sapphire embossing powder and heat set it. I also used the Nuvo Smooth Precision Glue Pen to roll on some adhesive along the edges and folds of the boy's clothes. I sprinkled on Sunset glitter for his hair, Butterscotch glitter for his shirt, and Rapture Blue for his shorts. I also added a wee bit of red, using Gypsy Red glitter, to the heart on his stethoscope. I layered a piece of Sticker Paper behind the banner shape, trimmed it, and then sprinkled on Sunset glitter as a frame.

I also die cut some cardstock using my Tonic Tangerine and the Tonic ARchway Stripe Invite Insert die set. I spritzed on some Nebula Blue mica mist to give it some dimension, and squeezed on some White Blizzard glitter drops.

I printed out a sentiment, cut it into a fish tail shape, inked the edges, and cut another fish tail banner shape to frame it. I layered these two together, adhered them under the panel edge, and added more White Blizzard glitter drops.

I colored a card base with Nuvo Custard Cream and Pacific Teal embellisment mousses. I just swirled some colors around until I had enough color to give it some depth and fun. I then spritzed the card panel with Nebula Blue mica mist. I also sprinkled on some Super Thick Silver and Sapphire embossing powders and heat them set as well. I layered everything together, and this card was done!

For more card tutorials, please click on my blog, Puppy Kisses and Paper Dreams.

This was a really fun card to make. I really like using pre-colored digi stamps. Sparkle N Sprinkle includes both a pre-colored and non-colored image so you can do what makes you happy with these digi stamps. And they can be sized to whatever you want. So easy and fun!

Thanks for stopping by. Have a magical day!

-Chris

Sparkle N Sprinkle compensated links are used when possible.
This blog post first appeared on Sparkle N Sprinkle's blog.

Wednesday, November 14, 2018

Sparkle N Sprinkle A Big Thanks

Hello! THANKS for stopping by! (See what I did there ... I said THANKS for checking out my A BIG THANKS card!) Woot woot!

Supply List:
Sparkle N Sprinkle A Big Thanks stamp set [00-928P8]
Sparkle N Sprinkle Pink Fizz glitter [GM2050]
Nuvo Smooth Precision Glue Pen [206N]
Nuvo Sea Siren Diamond Hybrid Ink Pads [81N]
Nuvo Tropical Fruits Diamond Hybrid Ink Pads [80N]
Nuvo Copper Penny Crystal Drops [654N]
Nuvo Simply White Crystal Drops [651N]
Nuvo White Blizzard Crystal Drops [758N]
Tonic Mixed Edge Diamond Layering Basics Die Set [1458e]
Tonic Mixed Edge Rectangle Layering Basics Die Set [1457e]
Photo Play Paper Crane Collection Pack [PC8804]
  Sparkle N Sprinkle Clear Detail embossing powder [EP280]
Versamark ink [VM-001]
Sparkle N Sprinkle Anti Static Bag [99512]
Memento Tuxedo Black ink [ME-900]
Tonic Tim Holtz Stamp Platform [1707e]
Tonic Tangerine machine [138e]
Tonic Easy Clean Craft Mat [1514e]


I started out by die cutting a bunch of diamond shapes, from the Photo Play Paper Crane Collection Pack, and the Tonic Tangerine die cutting machine, using the Mixed Edge Diamond Layering Basics Die Set. I cut a bunch of diamond shapes, then arranged them on a card base, and trimmed off all the pieces that went past the edge. After adhering them to the card base, I rolled on some Nuvo Smooth Precision Glue Pen around one of the diamond shapes, and sprinkled on some Pink Fizz glitter. I also squeezed on some Nuvo Simply White crystal drops in the corner, and Copper Penny crystal drops at some of the intersections of the diamonds. I also die cut additional layers using the Mixed Edge Rectangle Layering Basics Die and layered these all together along with the card base.

I stamped out the sentiment, using my Tonic Tim Holtz Stamp Platform. I loaded up the stamp into the stamp platform, and then inked up part of the stamp with Panama Rose hybrid ink, and then Spring Heather, and then Polar Ice. I inked up just a few letters of each color, to have an effect of multiple colors for the whole stamp. Once I had the ink colors stamped, I cleaned off my stamp, inked it again with Versamark ink, and then stamped it again, over the colored ink. I sprinkled on Clear Detail embossing powder and heat set it. This made the ink colors shiny and sparkly! Then, I fussy cut the sentiment and cut a frame for it too. I layered these together, popped them up, and adhered them to the card base. I also squeezed on a few drops of White Blizzard crystal drops along the letters too.

I love this big bold thanks sentiment. I definitely can use it for tons of cards and look forward to all the fun and creative things I can do with it.

Thanks for stopping by. Have a magical day!

-Chris

Sparkle N Sprinkle compensated links are used when possible.
This blog post first appeared on Sparkle N Sprinkle's blog.

Wednesday, November 7, 2018

Sparkle N Sprinkle Koi Pond Beauty

I don't even know where to start for this card ... I LOVE the new Sparkle N Sprinkle Koi Pond Beauty set, one of Sparkle N Sprinkle's November releases, and I wanted to make a card with swirling water and koi swimming in layers ... and this is what I came up with. Let's check it out!

Supply List:
Sparkle N Sprinkle Koi Pond Beauty stamp set [00-918P5]
Sparkle N Sprinkle Clear Detail embossing powder [EP280]
Sparkle N Sparkle Robin's Egg embossing powder [EP468]
Sparkle N Sprinkle Caribbean embossing powder [EP234]
Sparkle N Sprinkle Skylight embossing powder [EP212]
Sparkle N Sprinkle Ocean glitter [G1126]
Sparkle N Sprinkle Waterfall glitter [G1071]
Sparkle N Sprinkle 1/8" Tear-ific Tape [SAT02]
Sparkle N Sprinkle 1/4" Tear-ific Tape SAT01]
Sparkle N Sprinkle 1/2" Tear-ific Tape [SAT04]
Anti Static Bag [99512]
Versafine Onyx Black ink [VF-82]
Nuvo Watercolor Pencils - Hair & Skin Tones [521N]
Nuvo Watercolor Pencils - Brilliantly Vibrant [520N]
Nuvo Aqua Shimmer Glitter Gloss Pen [888N]
Nuvo Radiant Gold Gilding Flakes [850N]
Nuvo Deluxe Adhesive [200N]
Nuvo Smooth Precision Glue Pen [206N]
Tonic Mini Blender Brush Set [1558e]
Tonic Jasmine Sunset Layering Die Collection [1110e]
Tonic Tim Holtz Glass Media Mat [1914e]
Tonic Tim Holtz Stamp Platform [1707e]
Tonic Tangerine machine [138e]


To create the card, I started prepping my materials. I prepped my watercolor cardstock with my Anti Static Bag. Then, I used the Tonic Tim Holtz Stamp Platform to stamp out the koi fish, leaves, and plants multiple times on watercolor cardstock, and Versafine Onyx Black ink. I sprinkled on Clear Detail embossing powder and heat set them. I colored them with the Nuvo Watercolor Pencils, in both the Hair & Skin Tones set and Brilliantly Vibrant set. I lightly colored the fish with the watercolor pencils, without filling in the whole area, then I used the Nuvo Aqua Shimmer Glitter Gloss Pen to move the watercolor pencil around. This gave it some shine and gradation! Then, I fussy cut out the koi, leaves, and plants. I also cut strips of 1/8", 1/4", and 1/2" Tear-ific Tape, about 8-12" long. Then, I adhered the glitters (Ocean, Waterfall) and embossing powders (Skylight, Caribbean, Robin's Egg) to the strips. After covering one full side of each strip of Tear-ific Tape, I pulled off the release paper from the opposite side, and re-dredged the Tear-ific tape through my pile of glitter or embossing powder. Once all the strips were covered, I heat set the embossing powder strips. I also ran some blue cardstock through my Tonic Tangerine and die cut out the die shapes with Tonic's Jasmine Sunset Layering Die Collection. Here are all the parts of the card, before I assembled everything.

As I was building the card together, I ran the Nuvo Smooth Precision Glue Pen along the outer edge of one of my die cut panels. I let the glue dry to a tacky finish, then applied the Nuvo Radiant Gold Gilding Flakes. I rubbed in the flakes into the tacky adhesive, then brushed off the remainder with the Nuvo Mini Brush. This whisks away all the un-adhered gilding flakes.

I adhered strips of the glittered and embossing powdered Tear-ific tape to the panel as well, and swirled all these colors together to make the card look like swirling water. Koi tend to swarm and they swirl all around one another trying to get in the best position. I tried to recreate that swirling frenzy! I put the fish at different levels and layers inside the swirling tear-ific tape waves.

Here is another shot of one of the plants, which really shows the amazing shimmer from the Nuvo Aqua Shimmer Glitter Gloss! This card is super sparkly in person!

I also added a bit of Nuvo Smooth Precision Glue Pen in random spots on each koi fish, and after it was tacky, I adhered more Nuvo Radiant Gold Gilding Flakes. This gave the fish just a little extra pizzazz.

I have seen a lot of koi ponds, and the way the fish react when they see something and they all mass around looking for handouts makes me happy! The swirling frenzy always occurs ... especially if you have some koi food in your pocket :) I can't wait to see what you create with this stamp set!

Thanks for stopping by. Have a magical day!

-Chris

Sparkle N Sprinkle compensated links are used when possible.
This blog post first appeared on Sparkle N Sprinkle's blog.

Monday, October 22, 2018

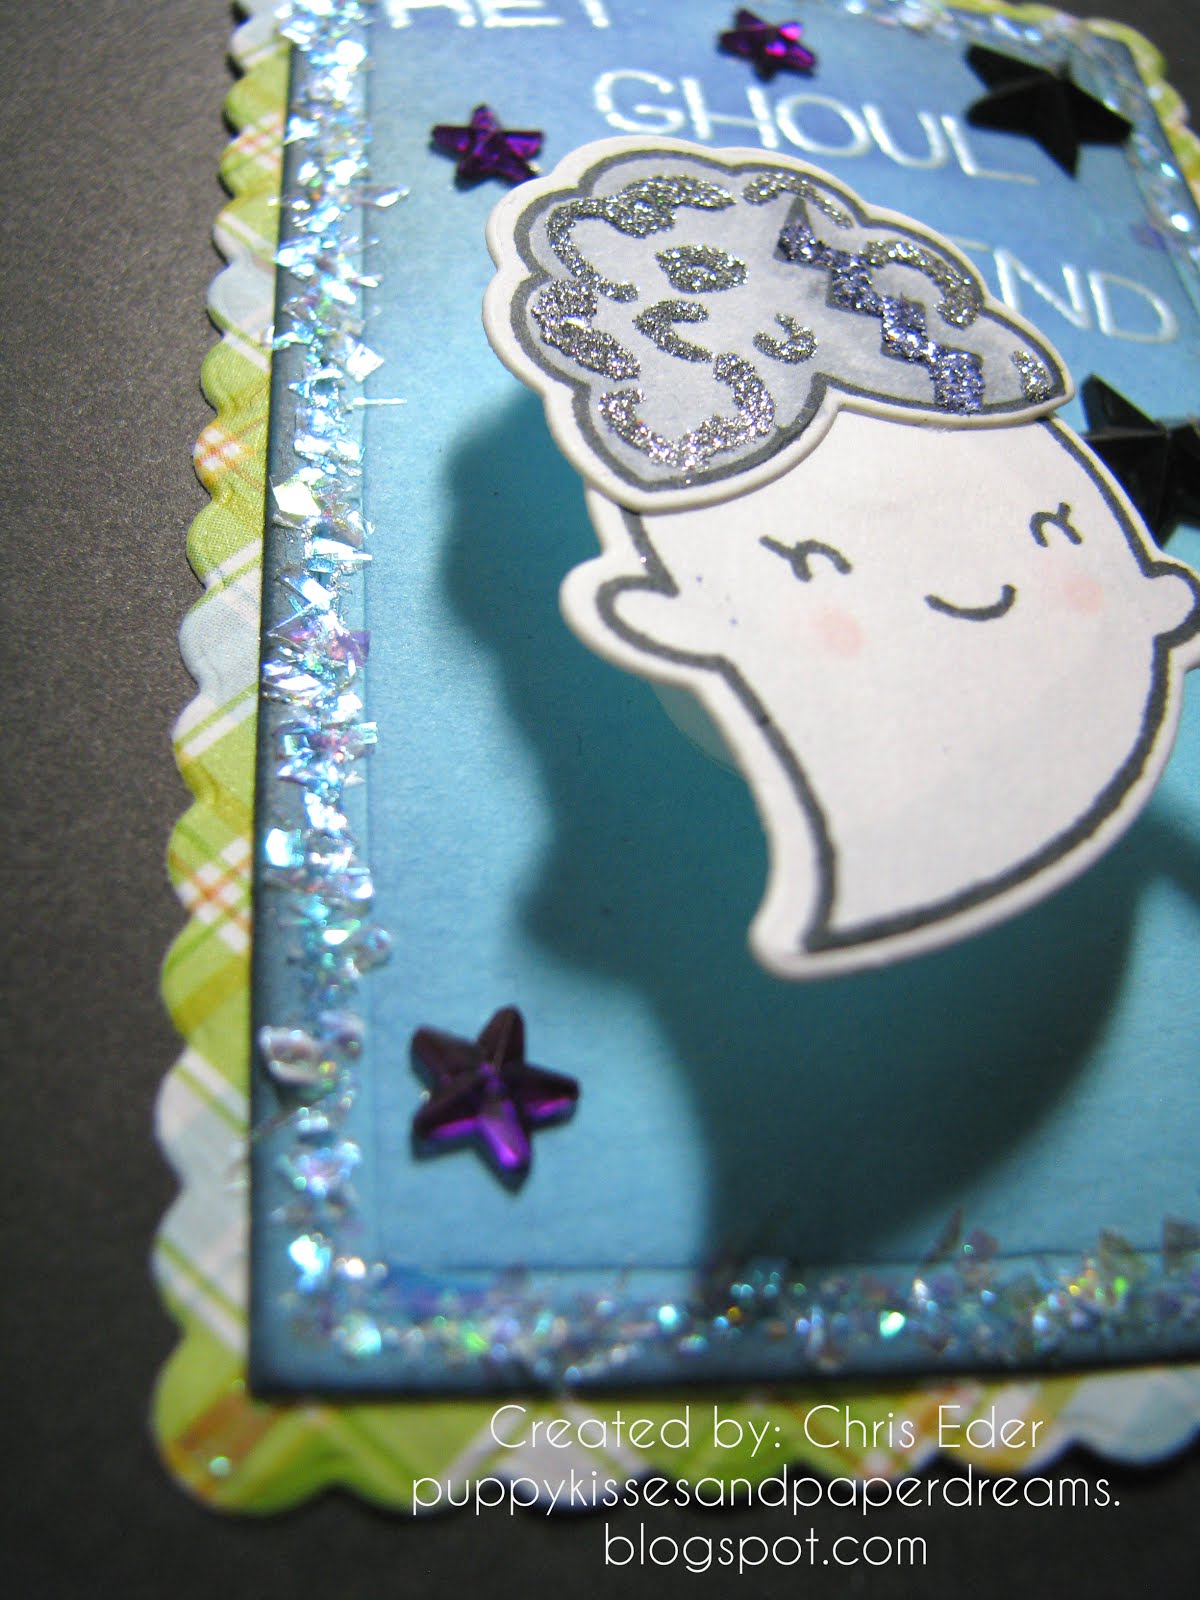
Ghoul Friend Card

Today's card is a little gift tag, that I am entering in the Lawn Fawnatics Challenge: Bling It On ... Ya'll know I could really do a LOT MORE bling, but I am keeping this one a little subtle. I know, unlike me :) I used Lawn Fawn's Booyah stamp set and lawn cuts. I stamped out the ghostie, her hair, and broom in Memento Tuxedo Black ink, and then colored the images with Copic markers. I die cut the images, with my Tonic Tangerine die cutting machine. I also die cut out the blue cardstock with Lawn Fawn's Stitched Rectangle dies and Lawn Fawn's Perfectly Plaid Spring Collection paper with Scalloped Rectangles dies.

Supply List:
Lawn Fawn Booyah stamp set
Lawn Fawn Booyah lawn cuts
Lawn Fawn Small Stitched Rectangle Stackables lawn cuts
Lawn Fawn Scalloped Rectangle Stacksables lawn cuts
Lawn Fawn Perfectly Plaid Spring collection paper pack
Memento Tuxedo Black ink
Sparkle N Sprinkle Silver Pearl embossing powder
Sparkle N Sprinkle Reflection glitter
Sparkle N Sprinkle Perwinkle glitter
Sparkle N Sprinkle Sunset glitter
Sparkle N Sprinkle Shaved Ice glitter
3/4" Action Wobble
Sparkle N Sprinkle Anti Static Bag 
Tonic Tangerine machine [138e]
Tonic Easy Clean Craft Mat [1514e]


I blinged up her hair too! I rolled on some Nuvo Smoth Precision Glue Pen onto her hair streak. I sprinkled on some Sparkle N Sprinkle's Periwinkle glitter. Then, I rolled on more glue pen onto her hair to give it some curls. I sprinkled on Sparkle N Sprinkle's Reflection glitter. This made her hair sparkle! I also used the Tim Holtz Stamp Platform to stamp out the sentiment and sprinkled on Sparkle N Sprinkle's Silver Pearl embossing powder and heat set it. Then, I blended some distress ink over the sentiment and the edges of the rectangle to give it some gradation.

I rolled more Nuvo Smooth Precision Glue Pen along the stitched edge of the card panel. I sprinkled on Sparkle N Sprinke's Shaved Ice chunky glitter. I mounted the ghoul on a 3/4" Action Wobble and attached it to the tag. I added a few black and purple blingly stars from my stash, and this tag was done!

This little tag is just what I need to give my Ghoul Friend a little giftie. I hope she enjoys it!

Thanks for stopping by. Have a magical day!

-Chris

Sparkle N Sprinkle compensated links are used when possible.

Wednesday, October 17, 2018

Sparkle N Sprinkle Memory In Our Heart

Hi! Today's card is using another new October release from Sparkle N Sprinkle. I used the Memory In Our Heart stamp set, and stamped out the sentiment and sprinkled on a rainbow of embossing powders! I also used the same embossing powders to create a layered frame for the sentiment, and a glitter lace background. Let's check out the card.

Supply List:
Sparkle N Sprinkle Memory In Our Heart stamp set [00-917P8]
Sparkle N Sprinkle Red Apple embossing powder [EP276]
Sparkle N Sprinkle Tangy Tangerine embossing powder [EP447]
Sparkle N Sprinkle Daffodil embossing powder [EP217]
Sparkle N Sprinkle Forest Green embossing powder [EP282]
Sparkle N Sprinkle Blue Ribbon embossing powder [EP279]
Sparkle N Sprinkle Amethyst embossing powder [EP199]
Sparkle N Sprinkle Bridal glitter [G1029]
Sparkle N Sprinkle Butterscotch glitter [GM2051]
Sparkle N Sprinkle Denim glitter [GM2033]
Sparkle N Sprinkle Sticker Paper [99558]
Sparkle N Sprinkle Glitter Brush [SG1400]
Versamark ink [VM-001]
Anti Static Bag [99512]
Tonic Mixed Edge Oval Layering Basics Die Set [1456E]
Tonic Will's Hand - Love Miniature Moments Die Set [1891E]
Photo Play Summer Bucket List 6x6 Paper Pad [BL-2566]
Tonic Tim Holtz Stamp Platform [1707e]
Tonic Tangerine machine [138e]
Tonic Easy Clean Craft Mat [1514e]


I positioned the stamp in my Tonic Tim Holtz Stamp Platform and stamped it onto white cardstock, with Versamark ink. I then sprinkled on a tiny bit of the embossing powders, before tilting the cardstock to remove the rest of all the powders. I sprinkled on just a bit of each color, because I knew they would co-mingle when I dumped them off the project. I was able to reuse the leftover, which you can see below. But, here is the sentiment with the rainbow of embossing powders: Red Apple, Tangy Tangerine, Daffodil, Forest Green, Blue Ribbon, and Amethyst. I used the left over embossing powders to create a multi-color matting around the sentiment too. I die cut all the ovals using Tonic's Mixed Edge Oval Layering Basics dies and my Tonic Tangerine machine.

I also used Tonic's Will's Hand - Love die cut to cut out the love and shadow. I inked ujp the love with Versamark ink and then dredged it through my pile of left over embossing powder from the sentiment above. I heat set this, and loved how it turned out! I layered it over the shadow image and adhered it to the front when I had the front done.

Here is a shot of all the embossing powders I used to create the sentiment and the frame. These are gorgeous powders and they worked perfect for this project!

And, here is a photo of how I created the background! I die cut out some hearts from some patterned papers in the Photo Play Summer Bucket List paper pack. I laid down a piece of Sticker Paper, pull away the release paper, and then die cut an oval from the release paper. I replaced the oval onto the sticker paper to keep it from being covered by the glitter. I pressed down the hearts into the sticker paper. Then, I covered the sticker paper with a piece of lace, and pressed Bridal glitter. I burnished it really well with my finger tool, and then dusted off the glitter. I removed the lace, and then burnished in Denim glitter, which adhered to the revealed sticker adhesive that the lace had been covering up. This creaed a cool background! I also kept a strip of stick paper across the bottom, and pressed in Butterscotch glitter to the bottom strip before adhering the love die cut to the base.

I had a lot of fun making this card and I love how the rainbow of embossing powders worked out, which so perfectly showcased this amazing sentiment stamp!

Thanks for stopping by. Have a magical day!

-Chris

Sparkle N Sprinkle compensated links are used when possible.
This blog post first appeared on Sparkle N Sprinkle's blog.

Wednesday, October 10, 2018

Sparkle N Sprinkle A Rose For You Framed Image

Today's project is a sweet little framed bunch of roses in vases. This is the new A Rose For You digi stamp set from Sparkle N Sprinkle, released this month in October. I love this stamp set. Let's check out what I created.

Supply List:
Sparkle N Sprinkle A Rose For You digi stamp set [DIGI915BG]
Sparkle N Sprinkle Ocean glitter [G1126]
Sparkle N Sprinkle Shamrock glitter [GM2041]
Sparkle N Sprinkle Orchid Rose glitter [GM2016]
Sparkle N Sprinkle Glitter Brush [SG1400]
Nuvo Deluxe Adhesive [200N]
Nuvo Smooth Precision Glue Pen [206N]
Tonic Tim Holtz Glass Media Mat [1914E]
Tonic 12" Wide Base Craft Guillotine [454a]

Because I used a digi stamp, I started out by inserting the images I wanted to use into a word file on my computer. I sized them to the sizes I needed. I also had the idea of replicating the sized rose in the vase, a layered them over one another, in a bit of a staggered line. Then, I printed two copies of my images and sentiment (see more below) onto white cardstock using a color ink jet printer. Then, I fussy cut the roses from one of the copies. For the other copy, I fussy cut across the top of the roses and trimmed it to the size of the canvas onto which I was layering the image. I popped up the roses with dimensional pop dots to make the roses really pop!

Once I had all the layers created, I rolled on some Nuvo Smooth Precision Glue Pen onto select parts of the leaves, roses, and vases, and sprinkled on Shamrock, Orchid Rose, and Ocean glitters. Here is a close up of the vases and leaves.

I also layered some of the images in the digi stamp set for my sentiment and background. When I was sizing my digital images, I inserted the blue swirly image and then sized it and duplicated it several times. I layered these all over one another to make a really swirly background. I layered the sentiment over the swirls, and then once it was printed, I trimmed the cardstock to the size I wanted, and then blended some blue distress ink to the outer edges of the sentiment strip. I layered the sentiment across the front of the frame and then glued on two more of the roses to each edge of the sentiment.

Here is a shot of the rose image I created, after I trimmed it to the size of the canvas. I used the Glue Pen and the three glitters (Orchid Rose, Shamrock, Ocean) to decorate my project!

I enjoy working with digital images because I love how I can manipulate the sizes and layering. I also like that Sparkle N Sprinkle offers the "uncolored" image and the "colored" image options in the digi stamp sets. I used the colored image for this project because then I can focus all my time onto creating and blinging up the image instead of coloring! This was so much fun. I love it!

Thanks for stopping by. Have a magical day!

-Chris

Sparkle N Sprinkle compensated links are used when possible.
This blog post first appeared on Sparkle N Sprinkle's blog.

Wednesday, September 19, 2018

Sparkle N Sprinkle Merry Christmas Tree Tag

It isn't quite the holiday season yet ... but it is never too soon to make a fun, wonky Christmas tree! Today's project is a tag using Sparkle N Sprinkle's new Merry Christmas Tree digi stamp, which I die cut with Tonic Hexagon Layering Basics Die Set and then reconstructed it. It reminds me of a Dr. Seuss-type tree and it makes me happy! Let's dig deeper into this fun tree tag.

Supply List:
Sparkle N Sprinkle Merry Christmas Tree digi stamp [DIGI906BG]
Sparkle N Sprinkle Journal Mixed Media stamp set [00-606P5]
Sparkle N Sprinkle Hit the Beach embossing powder [EP394]
Sparkle N Sprinkle Super Thick Gold embossing powder [EP235]
Sparkle N Sprinkle Gold Coast embossing powder [EP364]
Sparkle N Sprinkle Bubblegum glitter [G1088]
Sparkle N Sprinkle Purple Fig glitter [GM2047]
Sparkle N Sprinkle Shamrock glitter [GM2041]
Sparkle N Sprinkle 24KT Gold glitter [GM2038]
Sparkle N Sprinkle Gypsy Red glitter [GM2005]
Sparkle N Sprinkle Ocean glitter [G1126]
Sparkle N Sprinkle 1/8" Tear-ific Tape [SAT02]
Sparkle N Sprinkle 1/4" Tear-ific Tape [SAT01]
Tonic Hexagon Layering Basics Die Set [1521E]
Nuvo Iced Americano Glitter Marker [190N]
Nuvo Morning Moss Glitter Marker [189N]
Nuvo Urban Graphite Glitter Marker [188N]
Versamark ink [VM-001]
Anti Static Bag [99512]
Nuvo Smooth Precision Glue Pen [206N]
Tonic Tangerine machine [138e]
Tonic 12" Wide Base Craft Guillotine [454a]
Tonic Easy Clean Craft Mat [1514e]


Because this is a digi image, I manipulated the size of the image on my computer, and then printed it out onto white cardstock. I printed two copies of it since I planned to die cut up the tree and needed a second image to layer behind so all the hexagon shapes would line up. After I die cut the tree, I adhered a strip of 1/8" Tear-ific Tape around all the edges, and pressed in Gold Coast embossing powder, and heat set them. This framed each hexagon shape, which you can see below.

I also wanted to highlight the sentiment. I trimmed the sentiment with my Tonic Guillotine trimmer, added some 1/8" Tear-ific Tape to the edges, and then pressed in some Ocean glitter. This really made the sentiment pop. I also added some glitter to the ornaments. I rolled on some Nuvo Smooth Precision Glue Pen and then sprinkled on Gypsy Red, Ocean, Bubblegum, and Purple Fig to the ornaments.

To create the tag and background, I started out by painting my chipboard tag with white gesso. Then, once it was dry, I marked up my Journal Mixed Media stamp set with the Nuvo Iced Americano Glitter Marker. I stamped out the image onto the tag and did this several times. Here is a photo of what that looked like.

For the next few layers on the tag, I inked up the "coffee cup stain" stamp from the Journal Mixed Media stamp set with the Nuvo Morning Moss Glitter Marker and stamped that circle a few times on the tag too. I also inked up the bubble image with the Urban Graphite Glitter Marker and stamped more of that image, but in this new color. After that was done, I adhered some big dimensional glue dots to the tag, and then sprinkled on some of the Super Thick Gold embossing powder and heat set it.

To finish the tag, I adhered a few strips of both 1/4" and 1/8" Tear-ific Tape across the tag. I sprinkled on 24KT Gold, Shamrock, and Gypsy Red glitters, as you can see below.

Here is a close up of that fun coverage and splatter I got from the Super Thick Gold embossing powder. It is fantastic!


This was a fun tag to make. I can't wait for the upcoming holidays, and showcasing this silly, fun, wonky Christmas Tree. It makes me laugh!

Thanks for stopping by. Have a magical day!

-Chris

Sparkle N Sprinkle compensated links are used when possible.
This blog post first appeared on Sparkle N Sprinkle's blog.