Friday, December 29, 2017

Joyous Wishes Shadow Box for Mom (#52/52) {12.29.2017}

Hi! Here is this week's card for my Mom ... and it wraps up a full year (52 cards!) that I have created and sent to her. Whew! But, let's get right underway and check out this card I made.

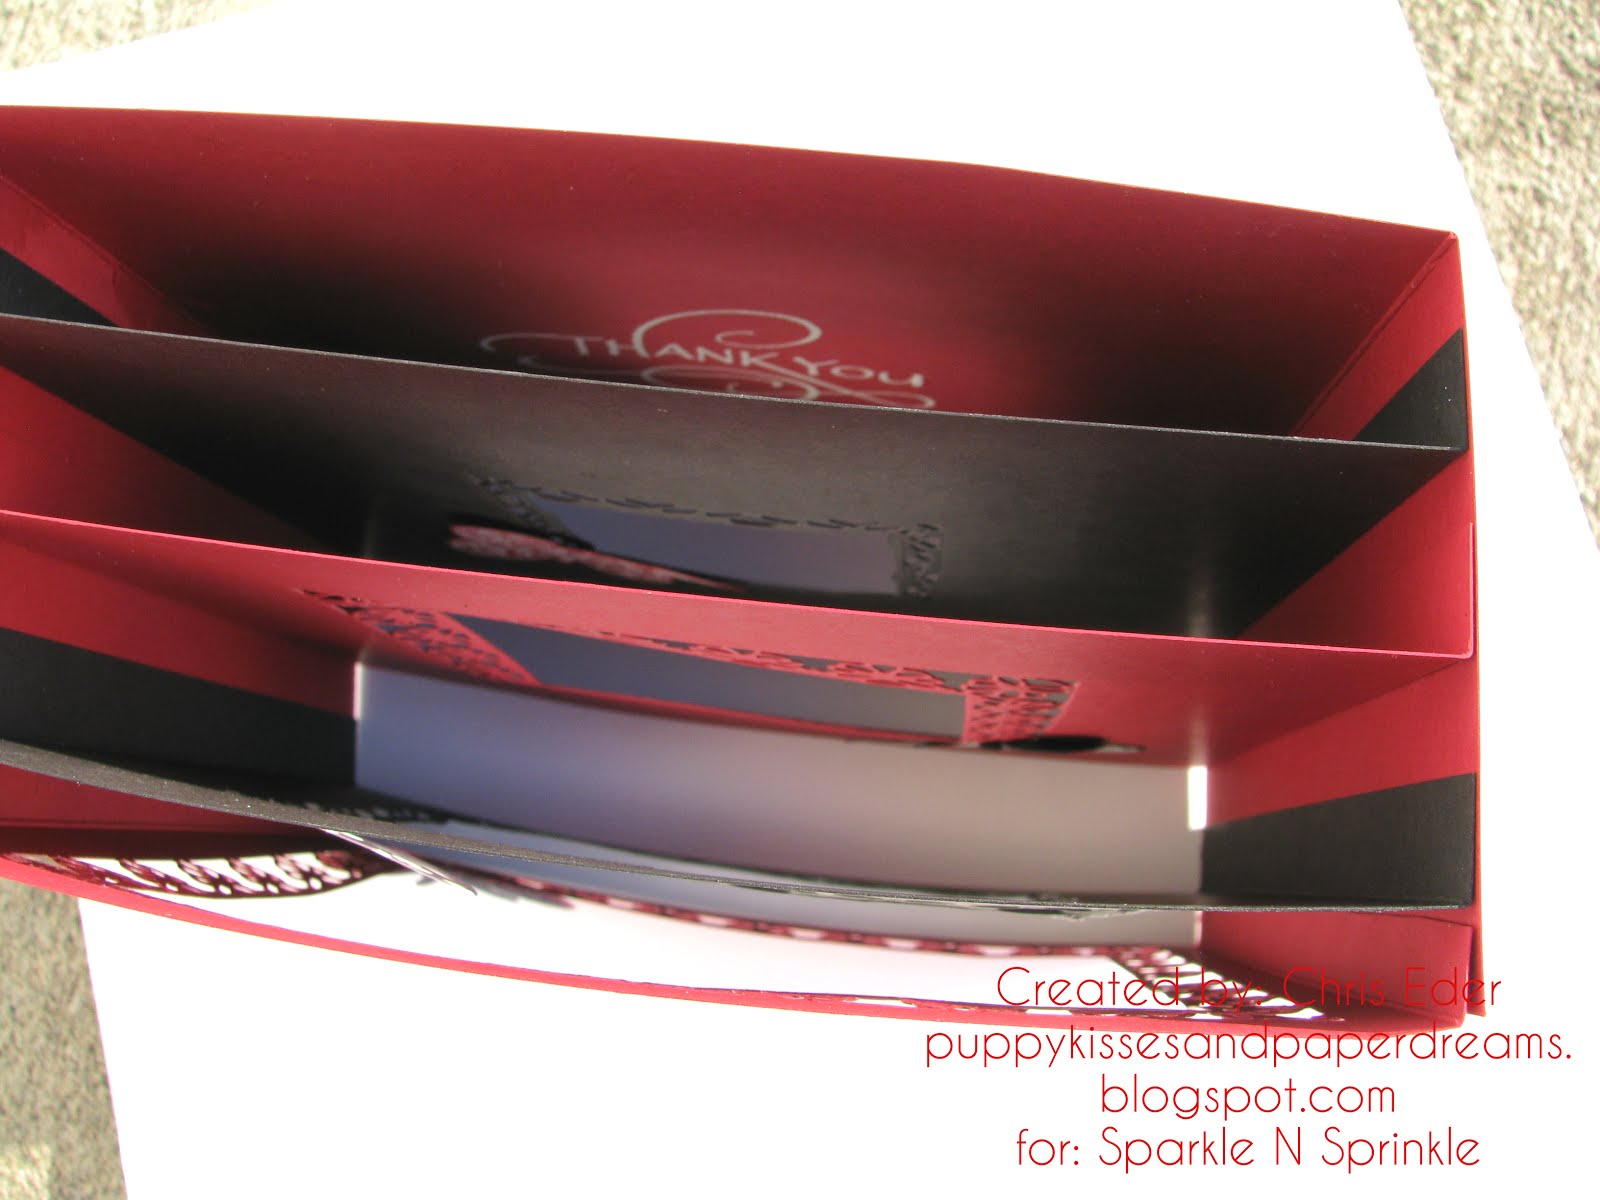
I was inspired by the current Lawn Fawnatics Challenge: Use Your Favorite Lawn Fawn Set, and I have been digging shadow boxes lately, so I combined the two and created this shadow box. I trimmed two pieces of cardstock to 4-1/4" x 7-1/2", and scored them at 1/2" and 2". I stamped out Lawn Fawn's Fanciful Frames onto the card panel on the front of the shadow box using my Tim Holtz Stamp Platform, with Memento Tuxedo Black ink. I colored the frame with Copic markers, and also used Copics to create the "wall paper" surrounding the frame. I laid the cardstock back into the Tim Holtz Stamp Platform, and inked up the frame again with Versafine Black Onyx ink. I stamped it again (which lined up perfectly, thanks to the Stamp Platform!) and then sprinkled on Sparkle N Sprinkle's Clear Detail embossing powder and heat set it. Then, I fussy cut out the inside of the frame.

I also trimmed some card panels to line the inside back and inside side panels of the shadowbox. I stamped some of the birch trees from the Lawn Fawn's Joy to the Woods stamp set onto the back panel, and then blended some Distress Inks on the card panels, and then stamped Lawn Fawn's Snowy Backdrops onto the card panels in Versamark Ink, and then sprinkled on Sparkle N Sprinkle's White Detail embossing powder and heat set it. This made it look like snow! I also stamped out more birch trees, the cardinal, fox, and squirrel from the Joy to the Woods stamp set. I also stamped out the joyful wishes sentiment with Versamark Ink, again using my Tim Holtz Stamp Platform, and sprinkled on Sparkle N Sprinkle's Golden Sparkle embossing powder, and heat set it. Here is a close up of the sentiment,

To add even more bling to the card, I rolled on some Sakura Glue Pen onto the cardstock I die cut using Lawn Fawn's Stitched Hillside die, and then sprinkled on Sparkle N Sprinkle's Olaf White glitter. Boom! Sparkly snow! I used this as my mid-layer in the shadow box and adhered both edges of the hillside to the inside of the shadow box.

Here is another shot of the critters and star from the Joy to the Woods stamp set, but it doesn't quite show the depth of the shadow box. It was about 2" deep.

I can't believe I made 52 cards for Mom this year! I hope she enjoyed all of them, and knows that I think of her all the time. I wish we lived closer together and I could see her on a regular basis or just stop by whenever I wanted or needed to see her. But, alas, we have phones, texting, emailing, and good old fashioned postal service to keep us together in spirit! I am also excited to enter this card into the Lawn Fawnatics Challenge: Use Your Favorite Lawn Fawn Set. Lawn Fawn has created a lot of stamp sets that I love, and it was a lot of fun to use these three sets and one die set to create this shadow box.

Thanks for stopping by. Have a magical day!

-Chris

Sparkle N Sprinkle compensated links are used when possible.

Friday, December 22, 2017

Hello! Card for Mom (#51/52) [12.22.2017]

Hi! This week's card for Mom is a simple, bright and cheery card. I wanted to just let her know I was thinking of her, so I created a card using some patterned paper, a strip of ribbon, and then a sentiment foam mounted and matted.  Here is the card.

I stamped out the hello sentiment using Alt E New's Halftone Hello Stamp Set and stamped two ink colors by placing the stamp into my Tim Holtz Stamp Positioner and stamping the upper part in orange and the lower part in red. I overlapped the inks a bit to help blend between the two colors. This is really easy to do when using this amazing stamp positioner! I also used the positioner to stamp the rest of the sentiment too, in yellow ink. Then, I swiped some Wink of Stella glitter pen over the sentiment to give it a little extra sparkle!

This came together pretty quick, and I love the bright, cheery colors! I hope Mom knows I am thinking of her.

Thanks for stopping by. Have a magical day!

-Chris

Sparkle N Sprinkle compensated links are used when possible.

Wednesday, December 20, 2017

Sparkle N Sprinkle Thank You Shadow Box Card {12.20.2017}

Hello! Designer Chris here. I created a Thank You shadow box card using the Thanks Stamp Set. Let's peek at it!

Before I fully explain how I made the card, here is a peek from the top where you can see all the dimension of the card. It was about 3-1/2" thick.

Okay, to explain how I created this, I cut two pieces of red cardstock, at 6-1/2" x 10" using the 12" Wide Base Craft Guillotine. I scored them both at 1/2" and 7". I also cut one piece of red cardstock and two pieces of black cardstock to 6-1/2" x 7-1/2". I also scored these at 1/2" and 7". All of these created a "front" of 6-1/2" x 6-1/2" square with tabs or side flaps. I laid down dies from the Venetian Lace Layering Die Collection and die cut the cardstock using the Tangerine Machine. After cutting the front piece, I layered it over the next layer of cardstock, and laid the dies inside the previous aperture to line them up. I taped the dies in with washi tape, then removed the upper (already die cut) layer and ran the next layer through the Tangerine.

After everything was die cut, and stamped out (I stamped the Thank You sentiment from the Thanks Stamp Set, using Versamark Ink , with my Tim Holtz Stamp Platform, after treating my cardstock with my Anti Static Bag, and sprinkled on White Detail embossing powder and heat set it). I added 1/4" Tear-ific Tape to each of the tabs on each die cut piece. I layered them up and attached them to the large flap on one side of the back panel. All the shadow box layers squash flat and this is what it looked like before I adhered the right edges of each of the layered tabs to the side flap.

I also stamped out the butterfly from the Thanks Stamp Set. I stamped it with Versamark Ink and sprinkled on Black Magic embossing powder and heat set it and then fussy cut the butterfly and adhered it to the card. I use the Easy Clean Mat under my projects especially when using glitter or embossing powders because clean up is so easy!

I repeated the same process but used Firecracker Red embossing powder and fussy cut this one too.

Here is another shot of the full card, with all the dimension.

This was a really fun card to make. I love the dimension of it, and how lightweight it is, and that it folds flat for mailing or transporting. But, it is really sturdy and stands up very nicely. I will definitely be making a shadow box card like this again with other dies and stamp sets!

Thanks for stopping by. Have a magical day!

-Chris

Sparkle N Sprinkle compensated links are used when possible.

Friday, December 15, 2017

Orchid Card for Mom (#50/52) {12.15.2017}

Today's card for Mom is a sweet card with a gorgeous orchid, and some sparkle! Gotta love that :) I created a card base with pink cardstock, then trimmed some patterned paper using my 12" Wide Base Craft Guillotine. I adhered it to my card base, then layered on a strip of green cardstock and then covered it with a strip of ribbon. I die cut a scalloped circle in green cardstock and another circle with white cardstock. I stamped the orchid from Alt E New's Oriental Orchid Stamp Set, which is a layering stamp. I stamped out the orchid in several shades of purple, and I stamped the sentiment from the same stamp set in purple ink too.

I After stamping out the orchid, I coated it with a swipe of Wink of Stella glitter pen, then covered it with glossy accents and let it dry. This photo captures some of the shine, but it is much shinier in real life!

This was was so pretty and I love that orchid stamp set! I want to use it a lot!

Thanks for stopping by. Have a magical day!

-Chris

Sparkle N Sprinkle compensated links are used when possible.

Wednesday, December 13, 2017

Sparkle N Sprinkle Bella Fairy Mirror Image & Shaker Card {12.13.2017}

Hello from Designer Chris! Today is a special card. I used the Bella Fairy Stamp / Die Set to make this card. And, I made it into a shaker card and did a mirror image technique to make a twin for Bella. Let's check out the card, shall we?

First, I had to create the second mirror Bella image. To do this, I placed my Bella stamp in my Tim Holtz Stamp Platform and closed to lid to pick it up onto the lip. I opened it up and placed a solid block stamp down where Bella would stamp onto. You can see the opened Tim Holtz Stamp Platform here.

And, then I closed the lid to make sure the stamp was lined up over the solid block stamp. You can see that my solid block stamp just fit the Bella stamp image.
I inked up the Bella image with my Versafine Black Onxy Ink and closed the lid and pressed the inked image onto the solid rubber stamp, and then lifted the lid. Here is a photo of what it looked like after this step.


Then, I trimmed a piece of cardstock using the 12" Wide Base Craft Guillotine and treated it with my Anti Static Bag. Then, I placed a piece of cardstock straight down onto the inked image on the solid rubber stamp. Note, don't move this piece of cardstock around, just place it directly down onto the inked image. Once it was placed there, I lightly rubbed the cardstock to transfer the image from the solid rubber block onto the cardstock.

And then ... peel the cardstock directly up! Here is the reveal of the mirror image transferred onto cardstock!

As soon as I transferred the mirror Bella image to the cardstock, I sprinkled it with Clear Detail embossing powder, heat set it, and I had a perfect mirror Bella! I also die cut out the mirror stamped image. I used the matching die cut in the Bella Fairy Stamp / Die Set and die cut Bella onto some scrap cardstock. Then, using it as a guide, I arranged the die cut image behind the Bella stamped mirror image. (I didn't have a light table, so I placed the two pieces of cardstock on my window and used the bright sunlight to make sure I lined up the image and die right!) You can see the little border around the edge of Bella here. Once I had this placed in the right spot, I placed the die into the negative space, taped it down with washi tape, and ran it through my Tangerine Machine die cutter. The die easily cut right through the back of the cardstock with the Bella stamp.

And look! Check out the two Bella images. One is the normal stamped image, and the other is the mirror image. They were both stamped in Versafine Black Onxy Ink and then covered in Clear Detail embossing powder and heat set. Pretty cool, eh? I used the Easy Clean Mat on my work surface, which is REALLY EASY to clean up and excess glitter wipes up really easy!

Then, I started building the card and coloring! First thing I did was color the two Bellas the same. I used pinks and blues for her dress and wings, and gave her brown hair.

I also gave her some extra sparkle! Sparkle N Sprinkle just revealed some NEW Microfine Glitters ... and they are GORGEOUS! I used several of them on this card. You can see the Mocha highlights in her hair, Ocean Breeze in her wings and shoes, and Pink Fizz on her dress. To adhere these glitters, I rolled the Sakura Glue Pen where I wanted to apply each glitter, and sprinkled them on. I brushed off the excess using my Glitter Brush. This is so much prettier in real life - still photos don't quite capture all the glittery gorgeous sparkle!

I also die cut the Bella out again and then blinged it up too! I rolled on more Sakura Glue Pen and used more of the new microfine glitters!! For this element, I used the Marine Blue on her wings, Black Diamond on her feather and shoes, and Caspia Sea on her dress.

I began building my card, and I started with a red cardstock base. I die cut the red cardstock using the Tonic Jasmine Sunset Layering Die Collection die. I cut a base with red cardstock, then cut an overlayer in black cardstock with the same die. I adhered these together for the base. I squeezed on some Winter Cranberry Glitter Accents in the upper corner after I built the card layers together. You can see both the layers of the card base and the glitter accents here.

And, I created a shaker element too! I die cut pink cardstock using the Tonic Deco Diamond Patterned Panels Die Set. I adhered a layer of acetate under the deco panel die cut and placed foam tape along the edges. I added in some sequins and placed it over a solid pink cardstock base. I layered up all the elements, added some rhinestone blight in the corners as well, and the card was finished.

I really love these new microfine glitters, and I know you will too! This mirror technique was really fun to use too, and I think I will have to do it more - it is nice to change it up a little bit now and again. And, who doesn't love a shaker card! Also, remember to post your creations in our Creative Challenge on our Facebook page. We really like to see what you create, and the winner gets a prize!

Thanks for stopping by. Have a magical day!

-Chris

Sparkle N Sprinkle compensated links are used when possible.

Sunday, December 10, 2017

Shadow Box {12.11.2017}

My friend is moving into a new apartment, so I made a Welcome to Your New Apartment shadow box card, with some emboss resist (so I can enter it into the Lawn Fawnatics Challenge: Emboss Resist). Here is the card.

I created the shadow box using the Shadow Box Card die. I stamped the gnome and mushroom house using Lawn Fawn's Gnome Sweet Gnome stamp set. I colored them with copic markers. I also stamped out the mail box from Lawn Fawn's Just For You, colored it with copic markers, and then die cut it with the matching dies on my Tangerine die cutting machine (which I LOOOOOVE!). I also stamped out some kitchen type utensils from the Just For You stamp set with Versamark Ink on the shadow box, sprinkled on White Detail embossing powder from Sparkle N Sprinkle, and heat set it. Then, I ink blended it up with distress inks. I adhered it all together, and the box was done! Here is a photo of one of the edges and more emboss resist!!

I hope my friend enjoys this little apartment warming gift. This card is also entered into the Lawn Fawnatics Challenge: Emboss Resist.

Thanks for stopping by. Have a magical day!

-Chris

Sparkle N Sprinkle compensated links are used when possible.

Embossed Holiday Greetings for Mom (#49/52) {12.08.2017}

The current Lawn Fawnatics Challenge is Emboss Resist, and I was inspired to make my Mom a card with a smattering of holiday sentiments using this technique! Here is the card.

I stamped all the sentiments from Lawn Fawn's Winter Scripty Sayings with Versamark Ink onto watercolor paper. I sprinkled on Sparkle N Sprinkle's White Detail embossing powder and heat set it. Then, I painted on blue inks which revealed all the sentiments.

I added this to a blue cardstock base, and my card was done! I will be entering this into the current Lawn Fawnatics Challenge: Emboss Resist. I hope Mom likes it, she does like blue, and she loves the holidays. It all comes together with this card!!

Thanks for stopping by. Have a magical day!

-Chris

Sparkle N Sprinkle compensated links are used when possible.

Thursday, December 7, 2017

Cardz 4 Galz Snowman Card {12.07.2017}

Check out these fun snowmen! The current Cardz 4 Galz Challenge is for snowmen! Here is the card I made to inspire you all. Can't wait to see what you create and post in the challenge.

I used an older Lawn Fawn stamp set (Making Frosty Friends), and stamped out these sweet snowmen and their accessories using my Tim Holtz Stamp Platform. I stamped them with Versafine Black Onyx ink and then removed my stamped images from the Tim Holtz Stamp Platform. I colored them using copic markers, and then replaced the stamped images back into the Tim Holtz Stamp Platform and stamped the images again with the Versafine Black Onyx ink. This time, I sprinkled on Clear Detail embossing powder from Sparkle N Sprinkle. For the white, I stamped out the images with Versamark Ink, and sprinkled on White Detail embossing powder and heat set them. Once I had all my parts stamped, colored, and heat embossed, I cut them out using matching die cuts. I used Lawn Fawn's Stitched Rectangle Stackables die and die cut a rectangle for my card panel. I used Distress Inks and ink blended some blues onto the card panel. After it was done and dry, I stamped the Lawn Fawn Snowy Backdrops stamp onto the card panel with Versamark Ink, and then sprinkled on Sparkle N Sprinkle's Silver Pearl embossing powder. I also used the sentiment from the Making Frosty Friends and stamped out the sentiment with Versamark Ink, and sprinkled on Sparkle N Sprinkle's Sapphire embossing powder and heat set it.

I also die cut some snowbanks using Lawn Fawn's Stitched Hillside Borders from white cardstock. I rolled on some Sakura Glue Pen, and sprinkled on Sparkle N Sprinkle's Bridal glitter along the edges. I layered these up using foam adhesive, and adhered the snowmen and all their parts on the front of the card. Then, it was done.

I really like this stamp set, and it sure is versatile and a lot of fun. I love having all the parts and can build my snowman however I want it! So much fun!!! I can't wait to see what you create and post for this challenge. Happy holidays!

Thanks for stopping by. Have a magical day!

-Chris

Sparkle N Sprinkle compensated links are used when possible.

Wednesday, December 6, 2017

Sparkle N Sprinkle Snowman Couple card {12.06.2017}

Happy Holidays from Designer Chris! What fun it is to ring in these holidays with this adorable Snowman Couple - Christmas digital stamp from Sparkle N Sprinkle! I wanted my card to focus on their love affair, and this is what I created. Let's check it out.

I started out by sizing the digi (pre-colored option) stamp on my computer. When I had it the size I wanted, I printed it out onto white cardstock. Then, I die cut it using the Tonic Essentials - Artist Trading Cards - Hello die around the image. I blended some blue ink along the edges to give the edge of the die some dimension. Then, I whipped out my Sakura Glue Pen, and rolled on adhesive to specific areas on the snowman couple. I used it to adhere glitter to these areas: Easy Green, Pinkerbell, and Bubblegum to the scarves and hats, and Creamsicle to the carrot noses and arms. I also adhered Waterfall to the blue outer edges of the snowman couple. I also used my (amazing!) Glitter Brush to dust off unadhered glitter. This brush is so soft and it just whisks away all the loose glitter super easily. Great addition to your tool kit!

I also die cut out the digi printed sentiment using another die from the Tonic Essentials - Artist Trading Cards - Hello die and blended some light blue ink to the edges on this too. Afterward, I squeezed on some Nuvo Deluxe Adhesive and sprinkled on Shaved Ice chunky, lightweight glitter and lightly pressed it into the wet adhesive. I let it dry before placing it onto the front of the card. I also repeated the Nuvo Deluxe Adhesive and Shaved Ice to the base of the snowman couple too, so they were standing in a snowy, glittery snowbank!

II used another Tonic Die for the card base. I used the Tonic Sunray Venus Layering Basics Die Set and cut a black card base. Then, I used the next smallest die to cut the Cascading Hearts Craft Perfect Embossed Paper. I layered these two together and wrapped a white and silver ribbon around the card. I added foam adhesive to the image and sentiment panels and adhered them onto the card front. I made sure one of those sweet textured hearts was visible on that gorgeous paper. Here is a close up.

This snowman couple is too cute, and they make me happy! I can't wait to see what you will do. You can check out this stamp set in action by watching Demo Donna's YouTube video HERE. I hope to see your creations in our Sparkle N Sprinkle Creative Challenge on Facebook, as well. To participate in the Creative Challenge, you have to request access to the group (to keep out the spammers!), and then you can post your creations there. Each monthly's challenge runs from the first of the month to the 25th. So excited to see you there!

Thanks for stopping by. Have a magical day!

-Chris

Sparkle N Sprinkle compensated links are used when possible.

Friday, December 1, 2017

Embossed Card for Mom (#48/52) {12.01.2017}

Hi! For this week's Card For Mom, I went a bit outside my comfort zone and made a card without stamping ... I did only dry embossing and a wee bit of die cutting! Let's check it out!

I cut a card base with glittery blue cardstock to make a square card. Then, I cut another square half an inch smaller. I trimmed this into five one inch strips and then dry embossed three of them. I also die cut a label in black cardstock and another label in the blue glittery cardstock. I dry embossed the black label. I adhered the strips, alternating with the non-embossed strips, and layered the label on top.

It is really fun to do something totally different. I like the elegance of this card, and I like that it has texture and some dimension while still being flat. I do hope Mom enjoys it too.

Thanks for stopping by. Have a magical day!

-Chris

Sparkle N Sprinkle compensated links are used when possible.

Wednesday, November 29, 2017

Sparkle N Sprinkle Blue Botanical Orchid Flowers {11.29.2017}

Hi! Designer Chris on the blog today. Wow - I love orchids, and this new Botanical Orchid Flowers stamp set is amazing! The orchid is beautiful, gorgeous, and so versatile! I had a lot of fun with this card. Let's check it out.

I positioned my orchid stamp in the Tim Holtz Stamp Platform. I treated some watercolor cardstock with my Anti Static Bag, and placed the cardstock inside the Tim Holtz Stamp Platform and stamped the image using Versafine Black Onyx ink, which is waterproof. I sprinkled on Clear Detail embossing powder, using the Craft Spoon, and heat set the image. Then, I started to watercolor! I colored the orchid in blue, with yellow and orange highlights, and colored the leaves in greens. I then colored the background with a light blue wash to add some depth. Then I sat it aside to dry. Once it was dry, I die cut the image using Tonic Studio's Scalloped Square Layering Basics Die Set. I also trimmed some black cardstock, and Tonic's Falling Glitter Craft Perfect Embossed Paper using the Tonic Studio 12" Wide Base Craft Guillotine, and then die cut them with the Tonic Studio's Scalloped Square Layering Basics Die Set and layered them all together!! Then, I covered the entire image with Nuvo Morning Dew crystal drops. This added a lot of shine to the flower and really popped it up a notch! I also squeezed some drops of the Nuvo Morning Dew crystal drops in the corner.

For the sentiment, I treated some extra piece of my watercolored cardstock with my Anti Static Bag, then positioned the sentiment inside the Tim Holtz Stamp Platform and stamped it using Versamark Ink. I scooped out some Peacock embossing powder using my Craft Spoon, and heat set it. Then, I cut out the sentiment with Tonic Studio's Scalloped Square Layering Basics Die Set. I LOVE this Peacock embossing powder ... absolutely stunning. You can see all the different colors in this embossing powder below. Wow!

One last shot of the edge of the card, with the sweet Nuvo Morning Dew crystal drops and that amazing Falling Glitter Craft Perfect Embossed Paper. This paper is incredible! It has such a wonderful texture, and the paper is really soft. It isn't stiff but is very substantial. Hard to describe, but oh so perfect!

I know you will love this Botanical Orchid Flowers stamp set, and I can't wait to see how you use it! Remember to post your creations in the Sparkle N Sprinkle Creative Challenge on Facebook, which runs from the first of each month to the 25th.

Thanks for stopping by. Have a magical day!

-Chris

Sparkle N Sprinkle compensated links are used when possible.

Friday, November 24, 2017

Kind Card for Mom (#47/52) {11.24.2017}

Hi! This week's card for Mom is from the Simon Says Stamp November 2017 monthly card kit. I trimmed a piece of green cardstock, from the kit, using my Tonic Studio 12" Wide Base Craft Guillotine to 5-1/2" x 8-1/2". I scored it to make it a side-fold card, and set it aside. I trimmed a piece of patterned paper from the kit to 4" x 5-1/4" and adhered it to the front of the card. Then, I stamped out the "Kind floral" stamp using my Tim Holtz Stamp Platform and Versamark ink onto chocolate cardstock. Then I colored the image with Prismacolor colored pencils. Once I was done coloring, I placed it back into my Tim Holtz Stamp Platform, reinked the stamp with Versamark ink, and stamped it over the colored image. The stamp platform allowed me to line it up exactly and stamp right over it! Then, I sprinkled on Gold Detail embossing powder from Sparkle N Sprinkle, and heat set it. I fussy cut around the Kind floral image and foam mounted it over the patterned paper. And, cuz I couldn't stop there, I adhered some stickers from the monthly kit all around. Here is the card!

Here is a close up of the Kind floral image. It sure is a gorgeous stamp! This was a fun monthly kit, and I love the supplies in it!

I love how this Gold Detail embossing powder really makes this image pop! And I love how easy it is to stamp out the image with any ink, color it, then replace it into the stamp platform and ink it up again and then heat emboss it. It is much easier to get a nice colored image without knocking out some of the embossing powder!

Thanks for stopping by. Have a magical day!

-Chris

Sparkle N Sprinkle compensated links are used when possible.

Thursday, November 23, 2017

Cards 4 Galz Cupcake Card {11.23.2017}

Hi! Here is my current Cardz 4 Galz card for our Cupcake Challenge.

I stamped out the Happy Birthday sentiment from Taylored Expressions' Bubble Greetings stamp set in Versafine Black Onyx ink on white cardstock and then sprinkled on Clear Detail embossing powder. I also stamped it again on patterned paper and embossed it with Clear Detail embossing powder too. I fussy cut the "happy" out and layered it over the original image. I die cut out the card panel with Tonic Die Layering Basic Die Set Sunray Venus die and cut the next larger size out of pink cardstock to mat the image. Here is the closeup of the Happy part of the sentiment.

I also stamped out several cupcakes using Lawn Fawn's (unfortunately, retired) Bake Me a Cake stamp set. I stamped them in colors that match the patterned paper. I love this stamp set, and will keep using it!!!

This card is bright and cheery, and these cupcakes make me happy! This will be going to my niece who loves bright colors.

Thanks for stopping by. Have a magical day!

-Chris

Sparkle N Sprinkle compensated links are used when possible.