Hi! Today's card is another new release from Sparkle N Sprinkle, for November. This one is so sweet, it is "Doctor at Heart" stamp set. I used the digi version, and I chose the pre-colored image which freed up my time to bling it up instead of doing a lot of coloring first. Let's peek at this card!

I sized the digital image on my computer, and then printed it with my color printer. I die cut the image with a banner die. I also blended on some blue distress ink to the edges. I then swiped the Nuvo Clear Mark embossing pen along the outer edge, sprinkled on Sapphire embossing powder and heat set it. I also used the Nuvo Smooth Precision Glue Pen to roll on some adhesive along the edges and folds of the boy's clothes. I sprinkled on Sunset glitter for his hair, Butterscotch glitter for his shirt, and Rapture Blue for his shorts. I also added a wee bit of red, using Gypsy Red glitter, to the heart on his stethoscope. I layered a piece of Sticker Paper behind the banner shape, trimmed it, and then sprinkled on Sunset glitter as a frame.
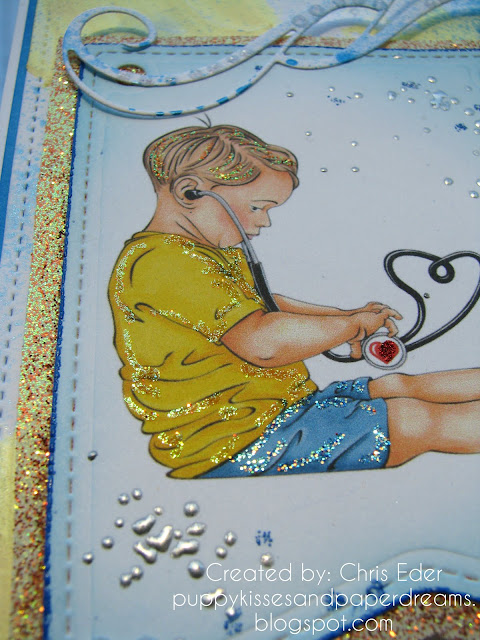
I also die cut some cardstock using my Tonic Tangerine and the Tonic ARchway Stripe Invite Insert die set. I spritzed on some Nebula Blue mica mist to give it some dimension, and squeezed on some White Blizzard glitter drops.

I printed out a sentiment, cut it into a fish tail shape, inked the edges, and cut another fish tail banner shape to frame it. I layered these two together, adhered them under the panel edge, and added more White Blizzard glitter drops.

I colored a card base with Nuvo Custard Cream and Pacific Teal embellisment mousses. I just swirled some colors around until I had enough color to give it some depth and fun. I then spritzed the card panel with Nebula Blue mica mist. I also sprinkled on some Super Thick Silver and Sapphire embossing powders and heat them set as well. I layered everything together, and this card was done!

For more card tutorials, please click on my blog, Puppy Kisses and Paper Dreams.
This was a really fun card to make. I really like using pre-colored digi stamps. Sparkle N Sprinkle includes both a pre-colored and non-colored image so you can do what makes you happy with these digi stamps. And they can be sized to whatever you want. So easy and fun!
Thanks for stopping by. Have a magical day!
-Chris
Sparkle N Sprinkle compensated links are used when possible.
This blog post first appeared on Sparkle N Sprinkle's blog.

Supply List:
Sparkle N Sprinkle Doctor at Heart digi stamp set [DIGI3152J]
Sparkle N Sprinkle Sapphire embossing powder [EP185]
Sparkle N Sprinkle Super Thick Silver embossing powder [EP467]
Sparkle N Sprinkle Rapture Blue glitter [G1078]
Sparkle N Sprinkle Gypsy Red glitter [GM2005]
Sparkle N Sprinkle Butterscotch glitter [GM2051]
Sparkle N Sprinkle Sunset glitter [G1040]
Sparkle N Sprinkle Sticker Paper [99558]
Sparkle N Sprinkle Glitter Brush [SG1400]
Nuvo Clear Mark Embossing Pen [103N]
Nuvo Deluxe Adhesive [200N]
Nuvo Smooth Precision Glue Pen [206N]
Nuvo Custard Cream embellishment mousse [827N]
Nuvo Pacific Teal embellishment mousse [822N]
Nuvo Nebula Blue Mica Mist [576N]
Nuvo White Blizzard Glitter Drops [758N]
Sparkle N Sprinkle Sapphire embossing powder [EP185]
Sparkle N Sprinkle Super Thick Silver embossing powder [EP467]
Sparkle N Sprinkle Rapture Blue glitter [G1078]
Sparkle N Sprinkle Gypsy Red glitter [GM2005]
Sparkle N Sprinkle Butterscotch glitter [GM2051]
Sparkle N Sprinkle Sunset glitter [G1040]
Sparkle N Sprinkle Sticker Paper [99558]
Sparkle N Sprinkle Glitter Brush [SG1400]
Nuvo Clear Mark Embossing Pen [103N]
Nuvo Deluxe Adhesive [200N]
Nuvo Smooth Precision Glue Pen [206N]
Nuvo Custard Cream embellishment mousse [827N]
Nuvo Pacific Teal embellishment mousse [822N]
Nuvo Nebula Blue Mica Mist [576N]
Nuvo White Blizzard Glitter Drops [758N]
Tonic Tangerine machine [138e]
Tonic Archway Stripe Invite Insert Die Set [1504e]
Tonic Verdi's Wave Flourish Die Set [1760e]
Tonic Easy Clean Craft Mat [1514e]Tonic Archway Stripe Invite Insert Die Set [1504e]
Tonic Verdi's Wave Flourish Die Set [1760e]
I sized the digital image on my computer, and then printed it with my color printer. I die cut the image with a banner die. I also blended on some blue distress ink to the edges. I then swiped the Nuvo Clear Mark embossing pen along the outer edge, sprinkled on Sapphire embossing powder and heat set it. I also used the Nuvo Smooth Precision Glue Pen to roll on some adhesive along the edges and folds of the boy's clothes. I sprinkled on Sunset glitter for his hair, Butterscotch glitter for his shirt, and Rapture Blue for his shorts. I also added a wee bit of red, using Gypsy Red glitter, to the heart on his stethoscope. I layered a piece of Sticker Paper behind the banner shape, trimmed it, and then sprinkled on Sunset glitter as a frame.

I also die cut some cardstock using my Tonic Tangerine and the Tonic ARchway Stripe Invite Insert die set. I spritzed on some Nebula Blue mica mist to give it some dimension, and squeezed on some White Blizzard glitter drops.

I printed out a sentiment, cut it into a fish tail shape, inked the edges, and cut another fish tail banner shape to frame it. I layered these two together, adhered them under the panel edge, and added more White Blizzard glitter drops.

I colored a card base with Nuvo Custard Cream and Pacific Teal embellisment mousses. I just swirled some colors around until I had enough color to give it some depth and fun. I then spritzed the card panel with Nebula Blue mica mist. I also sprinkled on some Super Thick Silver and Sapphire embossing powders and heat them set as well. I layered everything together, and this card was done!

For more card tutorials, please click on my blog, Puppy Kisses and Paper Dreams.
This was a really fun card to make. I really like using pre-colored digi stamps. Sparkle N Sprinkle includes both a pre-colored and non-colored image so you can do what makes you happy with these digi stamps. And they can be sized to whatever you want. So easy and fun!
Thanks for stopping by. Have a magical day!
-Chris
Sparkle N Sprinkle compensated links are used when possible.
This blog post first appeared on Sparkle N Sprinkle's blog.


