Hello from Designer Chris! One of Sparkle N Sprinkle's January reveal stamps is this Cherished Moments - Bride stamp set. This sweet bride is so pretty and I tried to highlight her for this project. Let's check it out.

I stamped out the bride in Memento Tuxedo Black Ink with my Tonic Tim Holtz Stamp Platform and then colored her with Copic markers. I placed the image back inside my Stamp Platform and inked up the stamp again with Versafine Black Onyx ink and restamped the image exactly over the original image. (Copic markers can smear Versafine Black Onyx ink so if I plan to use Copic markers, I stamp the image first with Memento Tuxedo Black ink and then overstamp with Versafine after coloring. Versafine ink is tacky enough, even though it isn't officially a pigment ink, to hold embossing powder.) I sprinkled on Clear Detail embossing powder and heat set it. I used my Sakura Glue Pen and rolled on glue to strategic spots and added glitter! I added Purple Fig glitter to her flowers, Caspia Sea on her eyes and earrings, and Shamrock on the leaves. I also added some Bridal glitter to her veil.

I also sprinkled on some Super Thick Silver embossing powder in strategic spots and heat set them. This gave some extra texture and shine to the project.

I colored the flowers, brushed on some Nuvo Deluxe Adhesive, and then sprinkled on Caspia Sea glitter.

As I was building the layers (more on that below!), I laid a heart stencil over the oval die and smeared on Moonstone Glimmer Paste. You can see the awesome sparkly hearts here!

Okay, on to how I created the layers for this mixed media project. I die cut several different ovals with my Tangerine die cutting machine (WOW, does this machine cut through paper like buttah!). Then, I added texture and colors to each layer. For the largest oval layer, I stamped the Crackle Background stamp in spots, with black ink. I stamped "first generation" and "second generation" images (second generation is stamping the stamp again with out re-inking up the stamp. The second generation stamp will stamp the image in a lighter color.) Then, I scooped a teeny bit of Nuvo Royal Aubergine embellishment mousse into my Mini Mister and added in some water. I shook it up and created my own mister spray in this gorgeous purple color. I spritzed on some purple mist and called it good!

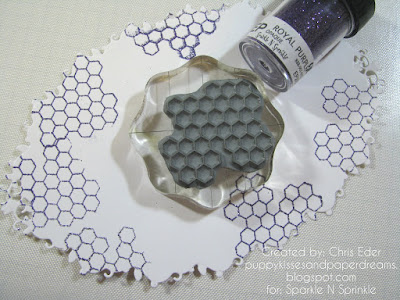
For the second layer, I stamped out the Honey Bees honey comb with Versamark Ink and then sprinkled on Royal Purple embossing powder and heat set it.
Here is a shot of all the three layers and the flowers I added later. I also added some stamped sentiments from the Honey Bees stamp set, and sprinkled on Spring Willow embossing powder and heat set it. This gave some more dimension to this layer.

I also spritzed some white flowers to give them some purple color, with my Royal Aubergine home-made mister spray!

This was really fun to create, and I liked how it came out. This Cherished Moments Bride stamp set is amazing, and it was really fun to color and embellish. I hope you liked it too! Keep your eyes peeled for the February Sparkle N Sprinkle Challenge to appear on our Facebook page. Please check it out and upload your cards and projects using a Sparkle N Sprinkle stamp to the February album! I can't wait to see what you create!
Thanks for stopping by. Have a magical day!
-Chris
Sparkle N Sprinkle compensated links are used when possible.

Supply List:
Cherished Moments - Bride stamp set [00-875P5]
Crackle Background stamp [00-609P5]
Honey Bees stamp set [00-775P5]
Tonic Ornate Frame Layering Die Collection [1111e]
Purple Fig glitter [GM2047]
Caspia Sea glitter [GM2048]
Shamrock glitter [GM2041]
Bridal glitter [G1029]
Clear Detail embossing powder [EP280]
Royal Purple embossing powder [EP275]
Spring Willow embossing powder [EP388]
Super Thick Silver embossing powder [EP467]
Versafine ink [VF-82]
Versamark ink [VM-001]
Anti Static Bag [99512]
Memento Tuxedo Black ink [ME-900]
Nuvo Royal Aubergine Embellishment Mousse [821N]
Nuvo Moonstone Glimmer Paste [953N]
Nuvo Deluxe Adhesive [200N]
Sakura Glue Pen [Quicky]
Nuvo Royal Aubergine Embellishment Mousse [821N]
Nuvo Moonstone Glimmer Paste [953N]
Nuvo Deluxe Adhesive [200N]
Sakura Glue Pen [Quicky]
Tonic Tim Holtz Stamp Platform [1707e]
Tonic Tangerine machine [138e]
Tonic 12" Wide Base Craft Guillotine [454a]
Tonic Easy Clean Craft Mat [1514e]
Copic markers
I stamped out the bride in Memento Tuxedo Black Ink with my Tonic Tim Holtz Stamp Platform and then colored her with Copic markers. I placed the image back inside my Stamp Platform and inked up the stamp again with Versafine Black Onyx ink and restamped the image exactly over the original image. (Copic markers can smear Versafine Black Onyx ink so if I plan to use Copic markers, I stamp the image first with Memento Tuxedo Black ink and then overstamp with Versafine after coloring. Versafine ink is tacky enough, even though it isn't officially a pigment ink, to hold embossing powder.) I sprinkled on Clear Detail embossing powder and heat set it. I used my Sakura Glue Pen and rolled on glue to strategic spots and added glitter! I added Purple Fig glitter to her flowers, Caspia Sea on her eyes and earrings, and Shamrock on the leaves. I also added some Bridal glitter to her veil.

I also sprinkled on some Super Thick Silver embossing powder in strategic spots and heat set them. This gave some extra texture and shine to the project.

I colored the flowers, brushed on some Nuvo Deluxe Adhesive, and then sprinkled on Caspia Sea glitter.

As I was building the layers (more on that below!), I laid a heart stencil over the oval die and smeared on Moonstone Glimmer Paste. You can see the awesome sparkly hearts here!

Okay, on to how I created the layers for this mixed media project. I die cut several different ovals with my Tangerine die cutting machine (WOW, does this machine cut through paper like buttah!). Then, I added texture and colors to each layer. For the largest oval layer, I stamped the Crackle Background stamp in spots, with black ink. I stamped "first generation" and "second generation" images (second generation is stamping the stamp again with out re-inking up the stamp. The second generation stamp will stamp the image in a lighter color.) Then, I scooped a teeny bit of Nuvo Royal Aubergine embellishment mousse into my Mini Mister and added in some water. I shook it up and created my own mister spray in this gorgeous purple color. I spritzed on some purple mist and called it good!

For the second layer, I stamped out the Honey Bees honey comb with Versamark Ink and then sprinkled on Royal Purple embossing powder and heat set it.

Here is a shot of all the three layers and the flowers I added later. I also added some stamped sentiments from the Honey Bees stamp set, and sprinkled on Spring Willow embossing powder and heat set it. This gave some more dimension to this layer.

I also spritzed some white flowers to give them some purple color, with my Royal Aubergine home-made mister spray!

This was really fun to create, and I liked how it came out. This Cherished Moments Bride stamp set is amazing, and it was really fun to color and embellish. I hope you liked it too! Keep your eyes peeled for the February Sparkle N Sprinkle Challenge to appear on our Facebook page. Please check it out and upload your cards and projects using a Sparkle N Sprinkle stamp to the February album! I can't wait to see what you create!
Thanks for stopping by. Have a magical day!
-Chris
Sparkle N Sprinkle compensated links are used when possible.
You really highlighted a ton of product on this gorgeous creation, Chris. Great job on all these beautiful layers.
ReplyDeleteGorgeous creation using lots of great product!! A very beautiful design!
ReplyDelete