Hello! THANKS for stopping by! (See what I did there ... I said THANKS for checking out my A BIG THANKS card!) Woot woot!
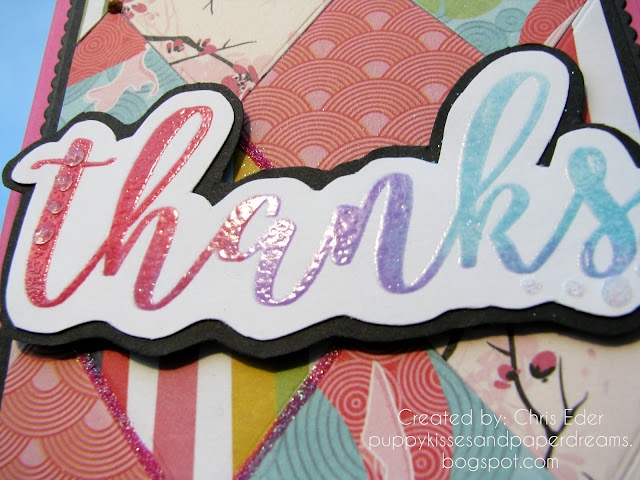
I started out by die cutting a bunch of diamond shapes, from the Photo Play Paper Crane Collection Pack, and the Tonic Tangerine die cutting machine, using the Mixed Edge Diamond Layering Basics Die Set. I cut a bunch of diamond shapes, then arranged them on a card base, and trimmed off all the pieces that went past the edge. After adhering them to the card base, I rolled on some Nuvo Smooth Precision Glue Pen around one of the diamond shapes, and sprinkled on some Pink Fizz glitter. I also squeezed on some Nuvo Simply White crystal drops in the corner, and Copper Penny crystal drops at some of the intersections of the diamonds. I also die cut additional layers using the Mixed Edge Rectangle Layering Basics Die and layered these all together along with the card base.
I stamped out the sentiment, using my Tonic Tim Holtz Stamp Platform. I loaded up the stamp into the stamp platform, and then inked up part of the stamp with Panama Rose hybrid ink, and then Spring Heather, and then Polar Ice. I inked up just a few letters of each color, to have an effect of multiple colors for the whole stamp. Once I had the ink colors stamped, I cleaned off my stamp, inked it again with Versamark ink, and then stamped it again, over the colored ink. I sprinkled on Clear Detail embossing powder and heat set it. This made the ink colors shiny and sparkly! Then, I fussy cut the sentiment and cut a frame for it too. I layered these together, popped them up, and adhered them to the card base. I also squeezed on a few drops of White Blizzard crystal drops along the letters too.
I love this big bold thanks sentiment. I definitely can use it for tons of cards and look forward to all the fun and creative things I can do with it.
Thanks for stopping by. Have a magical day!
-Chris
Sparkle N Sprinkle compensated links are used when possible.
This blog post first appeared on Sparkle N Sprinkle's blog.
Supply List:
Sparkle N Sprinkle A Big Thanks stamp set [00-928P8]
Sparkle N Sprinkle Pink Fizz glitter [GM2050]
Nuvo Smooth Precision Glue Pen [206N]
Nuvo Sea Siren Diamond Hybrid Ink Pads [81N]
Nuvo Tropical Fruits Diamond Hybrid Ink Pads [80N]
Nuvo Copper Penny Crystal Drops [654N]
Nuvo Simply White Crystal Drops [651N]
Nuvo White Blizzard Crystal Drops [758N]
Tonic Mixed Edge Diamond Layering Basics Die Set [1458e]
Tonic Mixed Edge Rectangle Layering Basics Die Set [1457e]
Photo Play Paper Crane Collection Pack [PC8804]
Sparkle N Sprinkle Clear Detail embossing powder [EP280]
Versamark ink [VM-001]
Sparkle N Sprinkle Anti Static Bag [99512]
Tonic Tangerine machine [138e]
Tonic 12" Wide Base Craft Guillotine [454a]
Tonic Easy Clean Craft Mat [1514e]
I started out by die cutting a bunch of diamond shapes, from the Photo Play Paper Crane Collection Pack, and the Tonic Tangerine die cutting machine, using the Mixed Edge Diamond Layering Basics Die Set. I cut a bunch of diamond shapes, then arranged them on a card base, and trimmed off all the pieces that went past the edge. After adhering them to the card base, I rolled on some Nuvo Smooth Precision Glue Pen around one of the diamond shapes, and sprinkled on some Pink Fizz glitter. I also squeezed on some Nuvo Simply White crystal drops in the corner, and Copper Penny crystal drops at some of the intersections of the diamonds. I also die cut additional layers using the Mixed Edge Rectangle Layering Basics Die and layered these all together along with the card base.
I stamped out the sentiment, using my Tonic Tim Holtz Stamp Platform. I loaded up the stamp into the stamp platform, and then inked up part of the stamp with Panama Rose hybrid ink, and then Spring Heather, and then Polar Ice. I inked up just a few letters of each color, to have an effect of multiple colors for the whole stamp. Once I had the ink colors stamped, I cleaned off my stamp, inked it again with Versamark ink, and then stamped it again, over the colored ink. I sprinkled on Clear Detail embossing powder and heat set it. This made the ink colors shiny and sparkly! Then, I fussy cut the sentiment and cut a frame for it too. I layered these together, popped them up, and adhered them to the card base. I also squeezed on a few drops of White Blizzard crystal drops along the letters too.
I love this big bold thanks sentiment. I definitely can use it for tons of cards and look forward to all the fun and creative things I can do with it.
Thanks for stopping by. Have a magical day!
-Chris
Sparkle N Sprinkle compensated links are used when possible.
This blog post first appeared on Sparkle N Sprinkle's blog.


This is awesome Chris! Love what you did with the sentiment!
ReplyDeleteHi, Chris! Thank you for posting this to my FB page, and showcasing such a fantastic creation! Loving all your colors, the paper piecing which looks like mosaic, and your rainbow THANKS! You are a fantastic designer! hugs, de
ReplyDelete