Here is a copy of my post that is appearing on Sparkle N Sprinkle's blog today. You can check it out there, or here. Either way, enjoy!
Hi from Designer Chris!
Silhouette Stamps
I love silhouette stamps. They can be used in multiple ways, and today's card is using the Flower Silhouettes Stamp Set, one of Sparkle N Sprinkle's new March releases. This stamp set is FABULOUS! Let's peek at my card.


Nuvo Embellishment Mousse
For this card, I wanted to see if I could emboss OVER a Moussed background ... so I tried it! I love experimenting. I keep reminding myself that if it doesn't work, it is only paper and I can pitch it, or figure out a way to repurpose it. In this case, it worked out great to heat emboss over mousse! I pulled out two my of my favorite Mousse color Peony Pink and Pure Platinum. I rubbed some of the Pure Platinum mousse across the bottom of my card panel, and then Peony Pink above that. I felt like I needed some blue to have a hint of a sky in the background. I didn't have any blue mousse, so I thought, what the heck? And whipped out my Nuvo Crystal Drops Caribbean Ocean. I rubbed some of the Carribean Ocean drops over the card panel and it also worked out just as I was hoping! Here is what the background looked like, after rubbing in the Mousse and Crystal Drops. I let it dry for about 20-30 minutes and was ready to proceed to the stamping.
Heat Embossing & Nuvo Crystal Drops
After creating the background, I treated the background with my Anti Static Bag, then stamped the flower silhouette image onto my background with Versamark Ink Pad. Then, I sprinkled on Black Detail embossing powder and heat set it. Then I started decorating! I colored in the flowers with individual Crystal Drops. I used: Strawberry Coulis, Ripened Pumpkin, Dandelion Yellow, and Carnation Pink. I also used Sunlit Meadow drops to add highlights and sparkle to the flower leaves. I also added Caribbean Ocean to the butterflies.
Sentiment
I wanted to stamp out the sentiment too, but wanted it to coordinate with the card. I rubbed more Peony Pink Mousse onto some cardstock, but this time I layered it in a solid, thick layer to make a strong pink background. I treated the cardstock with my Anti Static Bag, then stamped the sentiment with the Versamark Ink Pad. I sprinkled on White Detail embossing powder and heat set it. Then, I die cut it into a long rectangle shape. Here is how it looked.
"Tear-ific" Tape
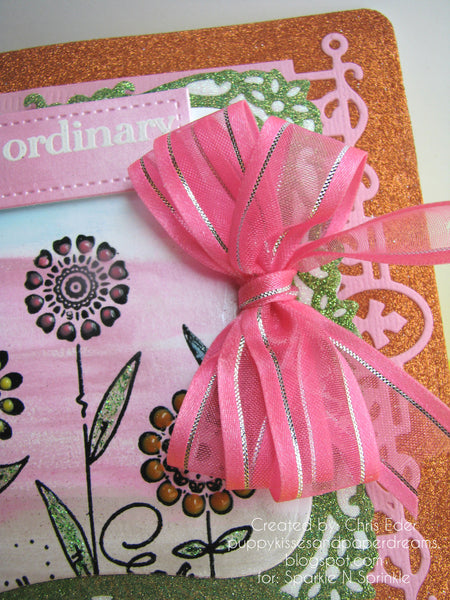
Here is the frame I created for the card. I did multiple layers. I die cut out the main card panel using a label die. Then, I covered another card panel with two strips of 2-1/2" "Tear-ific" Tape to cover the entire surface. I die cut it with a label die for the "Kiss" Technique. I pulled away bits of release paper and then burnished in Cloud Nine glitter. I removed the rest of the release paper, and burnished in Luau Green glitter. This made a really fun frame layer immediately behind my image panel. I die cut a pink piece of textured cardstock, and layered that behind the Luau Green/Cloud Nine frame layer. Needing just a teeny bit more sparkle, I cut another card panel, and layered more strips of 2-1/2" "Tear-ific" Tape to cover the entire surface and removed the release paper. I adhered the card front to the exposed tape, then burnished in Tiger Orange glitter to the remaining exposed adhesive. This created a bold orange frame around the card. Here is a close up of the frame.
I tied a triple-loop bow in pink and silver ribbon, and attached it to the edge. This finished off my card.

This card was a wonderful experiment that I am glad I tried. I will definitely use Mousse and Nuvo Crystal Drops as backgrounds again. I hope you enjoyed it too!

Thanks for stopping by. Have a magical day!
-Chris
Sparkle N Sprinkle compensated links are used when possible.
Cool background Chris! It worked great. Love all the little Nuvo Drop flowers too!
ReplyDeleteBeautifully created and so pretty for Spring and love the pretty background and all the 'sparkle'!
ReplyDeleteWow, Chris! So glad you embossed atop the mousse! It looks spectacular, as does that amazing background! I love that you used EP and glitter to make different textures with all those shapes and frames - GORGEOUS card! Thanks for the tips, too! hugs, de
ReplyDeleteWhat lovely clear detail you've got here with your embossing and a very pretty background.
ReplyDeleteThanks for sharing at Cardz4Galz. :)
I'm back with my other hat, Chris - I am so jealous that you can place those tiny Nuvo drops in the tee-tiny openings from the embossed flowers! What a great design tip! Always a delight for you to play with us at the Cardz 4 Galz Challenge. We love seeing your paper crafting projects, and are so happy you have joined us! Please check back to see if you have won a badge!
ReplyDeletecrafty hugs,
de