Thursday, August 31, 2017

Cardz 4 Galz Kraft Challenge / Masculine Birthday Card {08.31.2017}

Hi! Today's card is for the current Cardz 4 Galz Challenge: Kraft. I was really excited about this challenge because I like kraft cardstock, but don't use it enough. Also, I needed to create a masculine birthday card, so these two aligned perfectly! I made this bicycle birthday card for my friend, using kraft. Let's check it out!

I stamped out a bicycle, from an old stamp set I had in my stash. The birthday boy REALLY likes bikes, so I finally had a great excuse to use this old set. I stamped the image with dark brown ink on kraft cardstock. I then covered the image with Glossy Accents glue to give it some dimension. Here is a close up.

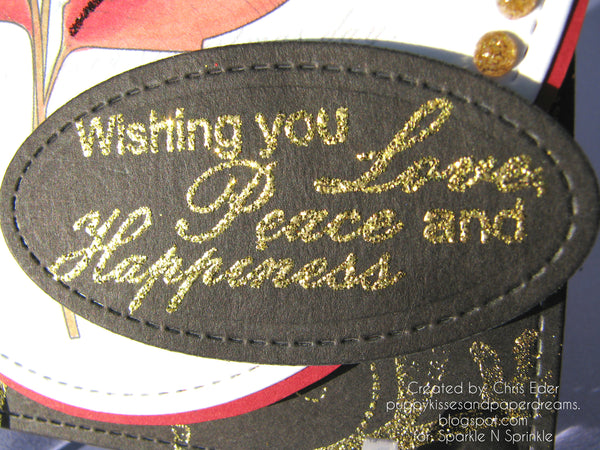
I layered the card panel over patterned paper. I also stamped out the sentiment, in gold pigment ink and then sprinkled on Sparkle N Sprinkle's Clear Detail embossing powder and heat set it. This made the sentiment even more bold. Yet, I still felt like the sentiment was a little bit lost on the kraft. So, I ink blended a brown ink over the kraft cardstock to darken it which gave more contrast to the gold sentiment. Here is a close up of that!

And, the inside! I was crafting with a friend, and totally don't remember what this stamp set was that I borrowed for the sentiment. I stamped the "Happy" in the gold ink and again sprinkled on Sparkle N Sprinkle's Clear Detail embossing powder and heat set it. This was another nice contrast to the black ink part of the sentiment.

I am not super great with masculine cards or using patterned paper ... so this was a fun challenge to use kraft as my integral feature, make it masculine, and add in some patterned paper. I like how this turned out, and the birthday boy really liked it!

Thanks for stopping by. Have a magical day!

-Chris

Sparkle N Sprinkle compensated links are used when possible.

Wednesday, August 30, 2017

Sparkle N Sprinkle Autumn Berry Wreath card {08.30.2017}

Hi! Designer Chris, with my latest card showing one of the amazing Sparkle N Sprinkle August release stamp sets! I chose the Autumn Berry Wreath stamp set to highlight for this month. Wow! What a gorgeous stamp set, it is such a beautiful wreath! Swoon! Let's check out my card, shall we? 

I stamped the wreath, using my NEW (and incredible!) Tonic Studio Tim Holtz Stamping Platform onto watercolor paper, using Versamark Ink, after treating the paper with the Anti Static Bag. Because the watercolor surface is uneven, it was super helpful to stamp multiple times in the exact same spot using the Tonic Studio Tim Holtz Stamping Platform! After having a solid image stamped, I sprinkled on Copper Dreams embossing powder and heat set it. This made the most gorgeous wreath! I watercolored it with watercolor markers. 

I treated a piece of vellum with my Anti Static Bag, then stamped on the sentiment, again using the Tonic Studio Tim Holtz Stamping Platform. I sprinkled on more Copper Dreams embossing powder and heat set it. When heat setting on vellum, warm up your embossing tool before moving it onto the vellum. This reduces warping. I stretched the vellum sentiment across the watercolor paper panel, and adhered the vellum underneath the panel. 

I created the card base with orange cardstock. I placed a flourish stamp from the Flourishes One stamp set into my Tonic Studio Tim Holtz Stamping Platform. I "inked it up" with Nuvo Glue Pen Large and then stamped the adhesive onto the card base. I let the ink dry to tacky and then rubbed on Nuvo Sunkissed Copper Gilding Flakes. I rubbed in the flakes, then used a stencil brush (stiff brush) to brush off all the rest of the gilding flakes. Ya gotta really get in there and give it quite a brushing to remove all the gilding flakes that aren't stuck down. This reveals all the great detail of the image. So beautiful! 

I think this is an absolutely gorgeous wreath stamp set. I know you will love it too! It is versatile, beautiful, and a lot of fun to use. Enjoy! 

Thanks for stopping by. Have a magical day! 

-Chris 

Sparkle N Sprinkle compensated links are used when possible.

Friday, August 25, 2017

Embossed Die Cut Mom Card (#34/52) {08.25.2017}

Hi! Today's card is a quick and fun one ... I used some NEW amazing Tonic Studios products! I cut my three colors of cardstock paper using the INCREDIBLE Tonic Studio 12" Wide Base Craft Guillotine paper trimmer. I then dry embossed and die cut them them, using my new Tonic Studio Idyllics Die & Emboss Set - Filigree Affections. Here is what the card looked like!

Here is a close up of the layered of this die and embossing folder set. Such a great set ... LOVE this combo set!

Here is a close up of the dimension and shapes of the embossing folder for the large panel (6x6) card front. So pretty!

I really like this set, and I see a lot more cards in my future using these dies and embossing folder ... Thank YOU Tonic Studios for your support!

Thanks for stopping by. Have a magical day!

-Chris

Sparkle N Sprinkle compensated links are used when possible.

Wednesday, August 23, 2017

Sparkle N Sprinkle Elf Sitter Flip Card {08.23.2017}

Hi! Designer Chris here. I just had to share with you this cute little Elf Sitter stamp and card I made using that stamp set! Let's check out the card, shall we? 

I stamped out the elf using my NEW (and AMAZING!) Tonic Studio Tim Holtz Stamp Platform!! If you haven't grabbed yours yet, head right on over to our Sparkle N Sprinkle website and add this amazing tool to your cart! This Stamp Platform can stamp both clear and rubber stamps. Just remove the lid, turn it, and put it back into the hinge, easy peasy! I treated my watercolor paper with my Anti Static Bag, by rubbing it onto my paper. Then, I stamped out the elf onto watercolor paper using Versafine Black Onyx ink. Because I was stamping onto watercolor paper, which has texture to it, this Stamp Platform is a life saver! I was able to restamp the image several times until I had GREAT coverage! 

Once it was stamped, I removed the paper from the Stamp Platform and sprinkled on Clear Detail embossing powder, and heat set it. The embossing powder helped give me some barriers around each area, which helped keep my watercolors from bleeding into one another. I used some watercolor markers and a watercolor blending brush to add color and blend everything together. Once I was done watercoloring him, I fussy cut him out and he was ready to go onto the card! Here is a close up of the little elf's face, where you can see the raised embossing powder. 

I die cut a flip card base using a die cut and pink cardstock. I wanted to go with a winter holiday theme, but change it up a little bit ... and who doesn't love pink, orange, and green together!?! I also die cut some panels from patterned paper, and ink blended the edges. I layered this all together. 

There are some really fun sentiments with this stamp set. Because this is a flip card, the middle section flips in and out. This was perfect to add two sentiments, one on each side. I die cut some white cardstock, blended some purple ink onto the die cut piece of paper, and then treated it with my Anti Static Bag. I used the Stamp Platform again, and stamped my sentiment using Versamark Ink, then sprinkled on White Detail embossing powder and heat set this. 

I repeated this for the second sentiment. 

Because I always like MORE ... I decided to add some extra color and fun to the card. I stamped the stars and the "Jingle" sentiment on the patterned paper, and sprinkled on Amour and Orange Marmalade embossing powders respectively, and heat set them. This gave some extra punch to the background and those marbled embossing powders are to die over! I LOVE them!! 

This card was really fun. I really like the colors, and it was fun to do something a little different from the traditional reds and greens that we often see during the winter holidays. I wanted to stretch my imagination and see what I could come up with. I know you will love this stamp set - and you will definitely want to get your hands on that Stamp Platform as well! You won't be disappointed!! 

Thanks for stopping by. Have a magical day! 

-Chris 

Sparkle N Sprinkle compensated links are used when possible.

Thursday, August 17, 2017

Honu Just Keep Swimming Mom Card (#33/52) {08.18.2017}

This week's card for Mom is a Honu (hawaiian green sea turtle). I LOVE Honu! They are one of my favorite animals. I got this stamp set from Island Paperie, a Hawaiian and tropical scrapbooking and rubber stamping company. But, this stamp set has been retired, I think. However, they have many amazing products that represent the beauty of Hawaii. I love their stuff! Let's check out these swimming honu!

I wanted to make a card evoking the image of honu swimming in the ocean currents. I created a card base with brown (sand colored, right?!?) cardstock, and layered a blue cardstock panel over it for the ocean. I free-hand cut some ocean currents from blue patterned paper, and made them larger in the foreground and smaller in the background to give it more depth to show how far the honu have to swim. I stamped two of the honu in Versamark Ink, on green cardstock, and sprinkled on Sparkle N Sprinkle's Gold Detail embossing powder and heat set it. I also stamped the larger honu onto some shell-colored patterned paper and heat embossed it too. I fussy cut out the shell pieces and pieced them over the embossed honu. Here is a close up of the larger honu with the paper pieced shell.

I love Dory's saying of "Just Keep Swimming" so I stamped that on a piece of cardstock and layered it and cut the ends in a banner shape. I added small rhinestone gems as the dots on the "i"s, and this card was done!

My Mommy knows how much I love honu, and she enjoys them too. Part of my parents' house has honu decorations. They are beautiful animals, and I love seeing them in the ocean when we are in Hawaii.

Thanks for stopping by. Have a magical day!

-Chris

Sparkle N Sprinkle compensated links are used when possible.

Cardz 4 Galz Cats Challenge Card {08.17.2017}

Hi! Here is today's card for the current Cardz 4 Galz Challenge #54, which is "Cats / Kittens." And, um, if there can be Christmas in July, there can definitely be Halloween in August! So, yes, please, any cat card I am going to make will be HALLOWEEN themed! Woot woot! Halloween is my favorite holiday and I love it. So, here is my card, featuring a spooky cat in a witch hat, ready for Halloween :)

I used Lawn Fawn's Critters in Costume (which might have been recently retired, sorry!) and stamped out the cat in the witch hat using my Tim Holtz Stamp Platform. I stamped the cat with Tuxedo Black Memento Ink. Then, I colored the image with Copic markers. I then replaced my cardstock back in my Tim Holtz Stamp Platform and restamped the image, but this time using Versafine Black Onyx ink. This ink stays wet longer, so it works great with embossing powder. After I stamped it with the Versafine Black Onyx ink, I sprinkled on Sparkle N Sprinkle's Sparkle embossing powder and heat set it. This gave the image a teeny bit of sparkle, and was really fun! Then, I die cut the image using the matching dies. I die cut the banner and circle using Lawn Fawn's Stitched Party Banner die set from patterned paper. For the orange circle cardstock, I stamped two of the little candies from the Critters in Costume stamp set in Versafine Black Onyx ink and sprinkled on Sparkle N Sprinkle's Sparkle embossing powder and heat set it. I stamped the star using Versamark Ink and sprinkled on Golden Sparkle and heat set that too.  I also stamped the candy corn stamp using Versamark Ink onto the purple banner, and sprinkled on Tangy Tangerine embossing powder and heat set it. I did this to add some additional interest to the background paper. I also decided to jazz up the cat's witch hat a bit. I rolled on some Nuvo Glue Pen Small tip, and sprinkled on Hanauma Bay glitter on the purple hat band and Starry Night glitter.

To kinda add some more black and tie all the colors together, I matted the banner with black, and used Lawn Fawn's Put a Bow On It to die cut a sweet little bow. I shaped the bow, adhered it together, and adhered it to the card. This added just a touch of fun and interest to the card. I layered all of this over another panel made from patterned paper, and layered it all over a card base.

Here is a close up of the candy corn images stamped out on the purple patterned paper, and heat set with Tangy Tangerine embossing powder. I just love that orange and purple together! 

I look forward to see what you create for Cardz 4 Galz's Challenge #54: Cats / Kittens.

Thanks for stopping by. Have a magical day!

-Chris

Sparkle N Sprinkle compensated links are used when possible.

Monday, August 14, 2017

Sparkle N Sprinkle August 2017 Reveal {08.15.2017}


Welcome to the August 2017
Sparkle N Sprinkle New Reveal Blog Hop! 


We are now revealing our new stamp sets on the 15th of each month.  On the first of the month, a new video kit club will be revealed.


NEW STORE - NEW BLOG - NEW PRODUCT LINES! 

We are continuing to add new product lines, so be on the look out for them.  


We have four new rubber stamp sets, a new digi-only stamp set, a new digital paper pack, plus one huge digi bonus bundle being revealed this month.  

The sets are:

Digital Version: DIGI859BG
Digital Version: DIGI865LS
Digital Version: DIGI866J
Digital Version: DIGI867


DIGI3131M Christmas Spirit Fairy (digi only)

DIGI4007LS Saguaro Desert Landscape Paper Pack

DIGI867-815-3128B Four Seasons Digi Bonus Bundle (combines Autumn Berry Wreath with lots of additional colored images, sentiments, and digi papers) 


You are definitely going to want both the digi version as well as the rubber version because when you purchase the digital versions, there are lots of extras that aren't available otherwise.  These extras can include additional images, additional sentiments, digi papers (in some cases), and a cut file.


The new sets are 20% off until the 20th of the month.  Head on over to the SNS store once you've finished the Blog Hop and start shopping.

One GRAND PRIZE WINNER will be announced on the 17th of the month.  One of the Designers is our Mystery Host and the winner will be selected from comments left on her blog.  You must leave a comment on each of the Designers' blogs in order to be selected as the winner, as you never know who the Mystery Host will be.  This is checked for compliance.

The GRAND PRIZE WINNER will be announced on the SNS Facebook page and on the SNS Blog and will receive all the rubber stamp sets revealed this month.

The Blog Hop order is:
(Tip: if you have difficulty with a particular link, try clicking on the Designer's blog title to be directed to their Home page.)
Chris .... YOU are HERE!


We hope you enjoy the New Reveal Blog Hop as much as we enjoy creating new projects for it.  Be sure to visit the SNS Blog for even more inspiration.  Something new is posted most every day.


Did you know that SNS has a You-Tube Channel?  If not, then you are in for a real treat.  Subscribe today to get all the latest tips and techniques!


The Sparkle N Sprinkle Creative Challenge group is on Facebook.  

This is a closed group (just trying to keep out spammers), but we want anyone who wants to participate to join.  Click on the link and join in on the fun today! 

The Creative Challenges run from the 1st - 25th of each month.  A SNS image (either rubber or digi) is required.  If you don't have any yet - no worries - there are some freebies located on the Home page of the SNS website.  Just scroll down the page a bit to see them. 

The Creative Challenge Winner and Top Three will be posted on the last day of each month.  The winner will receive a $15 Gift Certificate to go shopping at the SNS store. 

Please review all the Challenge Rules before submitting your photo 😀.  We can't wait to see what all you create using SNS images.

~~~~~~~~~~~~~~~~~~~~~~~~~~~~~~~~~~~~~~~~


The next stop on the SNS Blog Hop is Jess. I know you will LOVE what she has in store for you - she makes amazing cards!!


Now, back to my project. I used Dream Catcher Maiden digi stamp set. I sized the pre-colored image on my computer to the size I wanted for my card. I printed out two copies of it, and then die cut out one of the images using a rectangle die. I rolled on some Nuvo Glue Pen Small tip pen adhesive, and sprinkled on some Waterfall glitter (my NEW FAVORITE! glitter) along the outer edge of the rectangle. I also glittered up more of the card ... which you can see a little further below.
I decided to add glitter to a lot of the pieces of the card. I started by rolling out more Nuvo Glue Pen Small tip pen adhesive to the beads, and sprinkled on Ocean glitter. I did this just along the edges, which allowed the actual colors of the beads to show through, with a little boost of awesomeness from the Ocean glitter. I love how these turned out!
I also fussy cut out some feathers from the 2nd image that I had printed out (so I could fussy cut out parts of it to layer onto my card base for added dimension). I adhered the feathers using dimensional tape, and then used the Nuvo Glue Pen Small tip pen adhesive to roll out adhesive onto the feathers. I sprinkled on Orchid glitter to the purple feathers, Chameleon glitter to the brown feathers, and Misty Isles to the green feathers. Here is how they looked. I think this is so pretty. This awesome Dream Catcher Maiden stamp set is gorgeous. I LOVE the colors in this image!!
When I sized this digital image, I also sized and layered one of the sentiments right on top of the dream catcher. I used a label die to cut out the sentiment from my second image. I added some dimensional adhesive to the label and layered it over the card panel. I also rolled out more Nuvo Glue Pen Small tip pen adhesive to the edges of the sentiment label die, and sprinkled more of that gorgeous Waterfall glitter.
I also just had to add some sparkle to her hair. I added more Nuvo Glue Pen Small tip pen adhesive to her hair, and sprinkled on some Surf glitter. This glitter didn't match her hair color, but I thought it was a great highlight to her hair. Plus, this glitter is really pretty, so I had to use it!
Here is another shot of the card with all the glitters and that fun sentiment label popped up. The colors on this pre-colored digital image are incredible!
Here is a shot of all the glitters as I was adding adhesive and sprinkling on the glitters. Loads of fun, and all these glitters make me so happy!

I really love this stamp set and know you will too. The digi stamps are a lot of fun and so versatile. I also look forward to seeing your creations in our new monthly Creative Challenge. Info on that is above. And, hop on over to Jess's blog to keep hopping along!

Thanks for stopping by. Have a magical day!

-Chris

Sparkle N Sprinkle compensated links are used when possible.

Saturday, August 12, 2017

Sparkle Silhouette Card for Mom (#32/52) {08.11.2017}

Hi! This card for Mom was fun to make, and I got to use my NEW Tim Holtz Stamp Platform! I love silhouette stamps, but sometimes they can be difficult to stamp out well since there is so much solid areas that need to stamp. But, tada ... the Tim Holtz Stamp Platform solves that! Plus, the Tim Holtz Stamp Platform has a reversible lid, so you can switch between rubber stamps and clear stamps super quickly and easily :) I placed my red cardstock panel into my Tim Holtz Stamp Platform and placed my stamps where I wanted them. I used Sparkle N Sprinkle's Sparkle Brighter stamp set. I lowered the lid, picked up the stamps onto the lid, and then inked the stamps with Versafine Onyx Black ink. I re-inked and re-stamped several times to get a nice even coverage on the silhouette gal! Once I had the image stamped perfectly, I sprinkled Sparkle N Sprinkle's Sparkle embossing powder and heat set it. This gave the silhouette and sentiment a nice sparkle and shine!
 

Here is a close up of the sentiment covered with the Sparkle embossing powder too. I loved that I could make the sparkle sentiment sparkle!!!

And then to finish off the card, I added on some Checkers and Super Thick Silver embossing powders from Sparkle N Sprinkle. I heat set these (from the bottom!). I sprinkled on a bit more of these chunky powders and kept adding until I felt like I had a good thing going. These thick powders are really fun to use. I love them!

I think Mom will like this - it is a little different than I normally do, but I really wanted to use a silhouette stamp with my NEW Tim Holtz Stamp Platform (which I LOVE LOVE LOVE!) and this card was the perfect card to use the Tim Holtz Stamp Platform on. I will be using it pretty much every time I stamp anything out from now on!

Thanks for stopping by. Have a magical day!

-Chris

Sparkle N Sprinkle compensated links are used when possible.

Friday, August 4, 2017

Pretty Dress Mom Card (#31/52) {08.04.2017}

Hi! Today's card is Operation Use A Stamp In My Stash That I Have Never Used ... so this is what I used. This stamp is "Mia" by Julie Nutting Mixed Media Stamp Prima Marketing Inc. I love this stamp, even though it isn't what I normally gravitate towards. Yet, this stamp has been lingering in my stash for a few years. I can't remember how long I have had it. So nice to shop from our own stash. We have so many great things that we just don't quite get too as often as we want! Anyhoo, here is the card I created. I wasn't sure what I wanted for the background, but went ahead and did something simple. I stamped out the image onto dark blue sparkly cardstock in black Versafine ink. Then, I sprinkled on Sparkle N Sprinkle's Clear Detail embossing powder and heat set it. Then, I colored in the image with Prismacolor colored pencils. Here is the card.

The Clear Detail embossing powder was perfect for this dress. Even though it is clear, it had some shine to it, which I tried to capture in this photo. I matted the image with black cardstock, and adhered it to a white card base. This is also a "business sized" card which I don't do often either but sure is easy to do and fun!

I think my Mommy will like this. It is pretty simple, but the colors are pretty and I think that she will like it. Her favorite color is blue, so hence, I went with that as part of my theme :)

Thanks for stopping by. Have a magical day!

-Chris

Sparkle N Sprinkle compensated links are used when possible.

Thursday, August 3, 2017

Cardz 4 Galz Pretty Pastel Gratest Card {08.03.2017}

Howdy! Today's card is a card I made for a friend (she is the GRATEST, tee hee!), and I made it in pretty pastels for the current Cardz 4 Galz Challenge: Pretty Pastels. Here is the card.

I used Lawn Fawn's Best Pun Ever stamp set which has lots of punny images and sayings. I stamped the images and sentiment in different pastel colored inks. I also squeezed a dollop or two of Sparkle N Sprinkle's Nuvo Crystal Drdps in Dandelion Yellow to fill in the larger heart image.

I also squeezed on some of Sparkle N Sprinkle's Nuvo Crystal Drops in Strawberry Coulis and covered the pink hearts. These Crystal Drops added so much dimension! I die cut the card panel using a labels die. I die cut black cardstock to mat the card panel, and layered it all up on another label shaped Lawn Fawn Perfectly Plaid Rainbow Collection patterned paper.

This was a FUN challenge! I don't normally use pastel colors, so this was fun to do something in a softer color palette and to keep everything fairly subtle. Also I really like doing smaller shaped cards, and this one was so much fun and so sweet, petite, and cute! I hope my friend (who IS the gratest!) realizes how special she is to me. She is such an inspiration to me and a joy to be around.

Thanks for stopping by. Have a magical day!

-Chris

Sparkle N Sprinkle compensated links are used when possible.

Wednesday, August 2, 2017

Sparkle N Sprinkle Christmas Poinsettias card {08.02.2017}

Hello from Designer Chris! Today's card is a perfect poinsettia! I used the Spirit of Christmas Poinsettias digital stamp, which was perfect for this card. Let's check it out. 
Spirit of Christmas Poinsettias
I really like working with digital stamps. They are perfect to size and are manipulable. I chose the uncolored digi image that had some gray scale script behind the poinsettia. I sized and printed the image onto white cardstock. I colored my image with Copic markers and then die cut it into an oval shape and matted it with red cardstock. Then, I added sparkle! I rolled some adhesive onto my image using the Nuvo Glue Pen Small Tip, and then sprinkled on Collegiate Garnet glitter. I added more adhesive to the poinsettia centers, and sprinkled on Autumn Medley glitter. 
Spirit of Christmas Poinsettias
I wanted a little more oomph to the card, so I cut black cardstock into a rectangle, and stamped some flourishes from one of my ol' standby and well-loved Sparkle N Sprinkle stamp set: Flourishes One. I LOVE this set! It has several sizes of flourishes and they all have fun swirls. I treated the cardstock with my Anti Static Bag, stamped the flourishes with Versamark Ink, then sprinkled on Golden Sparkle embossing powder and heat set it. I layered this behind the oval image, and it really made the image pop a bit more. 
Spirit of Christmas Poinsettias
I repeated the same, Anti Static Bag to my black cardstock, and stamped out a sentiment from the Spirit of Christmas Poinsettia rubber stamp set (I used both the digi image and the rubber stamp set). I sprinkled on more Golden Sparkle embossing powder and heat set it. Then, I die cut it with an oval die cut. I layered it up with foam adhesive and added it to the front of my card. 
Spirit of Christmas Poinsettias
To finish off the card, I squeezed on three little drops of Honey Gold Crystal Drops along both sides of the oval. These were just perfect, and tied the sparkles and colors together. I love these Crystal Drops! 
Spirit of Christmas Poinsettias
I really like poinsettias, and they make me think of the winter holidays. This card makes me happy thinking about the holidays to come! 

Thanks for stopping by. Have a magical day! 

-Chris 

Sparkle N Sprinkle compensated links are used when possible.