Sunday, July 31, 2016

August 2016 Sparkle N Sprinkle Reveal [07.31.2016]

Welcome to Sparkle N Sprinkle's
August 1 New Reveal Blog Hop!


We have five new stamp sets to share with you today. These new sets are 20% off until the 3rd of the month. So once you finish the blog hop, head on over to the store and start shopping.  All of the new sets are available on cling mounted rubber or as a digital image.  

The sets are:

Eskimo Kisses 788 (digi version DIGI788)
Pool Friends 792 (digi version DIGI792)
Get Your Craft On 794  (digi version DIGI794)
Stella-Happy Meds 796  (digi version DIGI796)
Flower Cart 798  (digi version DIGI798)

On August 3rd, ONE GRAND PRIZE WINNER will be selected from the comments left on the Designers' blogs listed below. Please leave a comment with each Designer in order to be eligible for the Grand Prize. You never know who the Mystery Designer will be that has the winning comment.
 

The Grand Prize Winner, which will be announced on the SNS Facebook page and on the SNS Blog, will receive ALL of the new stamp sets released this month (or the digi versions, if preferred).


The Blog Hop order this month is:

Anne
Shona
Jess
Eret
Diane
Chris   <<<<<< this is me!
Belinda

(*Tip: if you have difficulty with a particular link, try clicking on the Designer's blog title to send you to their Home page.)


We hope you enjoy the New Reveal Blog Hop as much as we do. Thanks for joining us and remember to comment on each of the Designers' blogs to be eligible for the Grand Prize. Wonder who the Mystery Host will be this month????


The Sparkle N Sprinkle Creative Challenge also begins today. There are lots of prizes and recognition badges. Come check out how you can become a SNS Featured Artist as well. The theme is always Anything Goes using Loose Glitter, Embossing Powder, and/or Flock.


Have you checked out the SNS YouTube Channel featuring Demo Donna? If not, then you are in for a real treat. Subscribe today to get all the latest Demo Donna tips and techniques!


 And, now to my project, previewed above! I used the Pool Friends stamp set (792), and made a card highlighting the three smaller stamps in the set. Here it is again.
 

I created the background of the card, and tried to invoke a sandy beach with shells, some water, and a sunset in the background. I used two glitters and a sparkle n soft for this, and the amazing 2-1/2" Double sided Tear-ific Tape [SAT11]. I cut a card panel to the size I wanted, and laid down a strip of the tear-ific tape. Because my card panel was wider than the tape width, I layered a second strip of tear-ific tape beside the first to completely cover the card panel. I slightly overlapped the two edges too, where the two strips joined. This was to make sure I didn't have a slight gap between the two tape strips. Once I had the tear-ific tape adhered, I tore the tape in the middle of the card base to create a strip where the water would be. Here is what it looked like after I tore away the water area, and then burnished in Ocean Semi-transparent glitter [G1126].
Then, I pulled out a collection of teeny tiny shells from my stash, pulled off the release paper over the sandy bottom area, and pressed the shells into the amazing 2-1/2" Double sided Tear-ific Tape [SAT11]. I did this before adhering the sparkle n soft (next step) so the shells would be adhered directly to the tear-ific tape.
Once I had the shells adhered to the tape, I dusted on some of Sparkling Sands Sparkle N Soft [SS118]. I pile it all up, give it a press with my finger, and let it sit for a while. Then, I lightly burnish and remove the excess. I do this to make sure I get a thick and even coverage. Here is what it looked like in the "during" stage.
Then, next step was to do the sunset! I removed the release paper from the top of the card base, and sprinkled and burnished on Evening Glow Semi-transparent glitter [G1086]. Here is a shot of the in-progress release paper removing....  
Then, I realized I needed a frame to go around the outside of the card. I cut a second card base 1/4" bigger than the glittered up card base, and added strips of 1/8" Double sided "Tear-ific" Tape [SAT02]. I pulled back the release paper on each of the strips along the edge, and sprinkled on and burnished in Luau Green Velvet Glitter (microfine) [GM2004].
For each of the three images in the the Pool Friends stamp set (792), I stamped them in black ink, then colored them with Copic markers. Then, I die cut them with a stitched squares die. Because this was a water-themed card, I wanted the images to look wet and sparkly. So, I covered each of the images with Brushable Glue [540]. Once it dried, it provided a sheen over the image which looks really cool! Here is the beach ball.
Here is the rubber ducky. I shot this photo in bright sunlight outside to make sure I captured the sheen from the Brushable Glue [540]!
And, here are the drinks. Again, full sunshine to make sure the sheen from the Brushable Glue [540] showed!!
I layered the front card panel over the card panel edged in Luau Green Velvet Glitter (microfine) [GM2004]. Here is a shot of the incredible colors and all the sparkles! I love this Luau Green glitter ... so pretty!
The sentiment was stamped out in black ink, then I trimmed the cardstock to frame the sentiment. I wanted a little bit more pop to it, so I wrapped some 1/8" Double sided "Tear-ific" Tape [SAT02] around the edges and then burnished in some Jasper Blue Velvet Glitter (microfine) [GM2012]. And, to keep everything feeling consistent, I applied Brushable Glue [540] over the sentiment and let it dry, to give it the sheen the other images had as well!
These three images were perfect for this card. I think this would be the perfect card to give or send to someone who needed a little summer pick-me-up. It perfectly captures that I'll be there for you, and I've got your back! What a fun card to make and give!

The next stop on our blog hop is Belinda ... I know you will LOVE what she has in store for you! She is an incredible designer. Enjoy! 


Thanks for stopping by, have a magical day!

Chris

Wednesday, July 27, 2016

Sparkle N Sprinkle's Santa Stop Here Step Card [07.27.2016]

HI! Today's card is one I am also sharing over at the Sparkle N Sprinkle blog. I used the new Deer Duo Digital Stamp Set 797BG [DIGI797] for today's card. Let's take a peek.
These sweet reindeer are so cute! I colored them with Copic markers. Then, I used an oval die cut to cut out the deer duo. They needed a little extra something-something to frame them. I pulled out the Dimensional Glue [539], and squeezed a bead of it all around the edge of the oval. I sprinkled Luau Green Velvet Glitter (microfine) [GM2004] and set it aside to dry. 

This sweet heart between the two deer was calling my name, and needed some glitter to make it pop! So, I pulled out my Sakura Glue Pen [Quicky] and sprinkled on some Gypsy Red Velvet Glitter [GM2005]. This made the heart shine and sparkle!

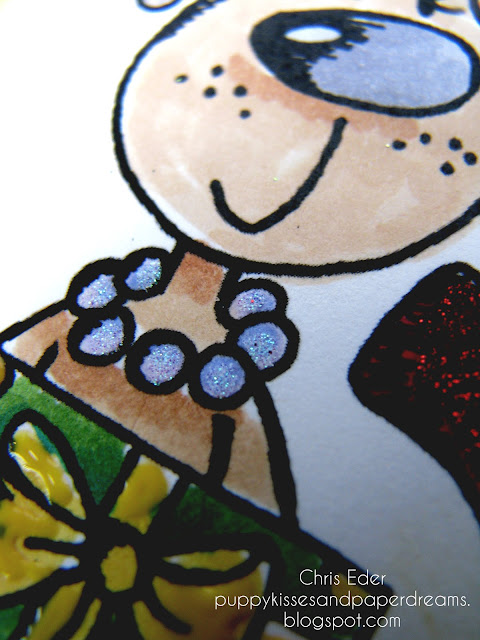
These sweet little deer are holding packages. After coloring the packages with Copic markers, I added some Dandelion Yellow Nuvo Crystal Drops [673N] on the dots and the ribbon.

After sparkling up the image, I decided to use a Step Card Base [CB-Step5]. I decided to create some presents across the bottom of the step card to make it more festive. I die cut squares of white cardstock. I masked off the heart from the Deer Duo stamp set [797P7] and stamped the heart onto each package, and then colored them with Copic markers. I adhered some 1/2" Double-sided Tear-ific Tape [SAT04] to white cardstock, and then die cut out little ribbons with some teeny border dies. I peeled off the adhesive, and burnished in some Bubble Gum Semi-Transparent Glitter [G1088] and some Daisy Velvet Glitter (microfine) Semi-Transparent [GM2019]. I layered the ribbons over the packages to match them to the deer packages. 

I also sparkled up the lady deer's bow. I used my Sakura Glue Pen [Quicky]. and sprinkled on some Cloud Nine Velvet Glitter (microfine) Semi-Transparent [GM2000]. Her bow was so cute!

I also sparkled up the lady deer's necklace with Cloud Nine Velvet Glitter (microfine) Semi-Transparent [GM2000] adhered with the Sakura Glue Pen [Quicky].

I printed out the sentiment from the new Deer Duo Digital Stamp Set 797BG [DIGI797], colored it with Copic markers, and applied the Sakura Glue Pen [Quicky] to the inside of the STOP ornaments, and sprinkled on Aztec Gold glitter [G1006]. I also used the Sakura Glue Pen [Quicky] to add in some Gypsy Red Velvet Glitter [GM2005] to the rest of the ornaments and I added lines above and below the sentiment to frame it. 

I assembled all the parts of the card into the Step Card Base [CB-Step5] and added in a bow made from the Lime Ribbon Pull Ribbon [MONR31] to finish it off. This made a fun and sweet card!

I hope you enjoyed the card. It makes me smile!
Thanks for stopping by, have a magical day! 
Chris

Wednesday, July 20, 2016

Sparkle N Sprinkle Wetlands Stamp Sets Card [07.20.2016]

Today's card is a card I made, as a designer for Sparkle N Sprinkle, using their new Wetlands stamp sets. These are two different stamp sets that are designed to work together so I used both of them (Wetlands 1 [DIGI790] and Wetlands 2 [DIGI791]). Let's check out the card!
I started by inserting the water & trees image into a document. I wanted a layered effect, so I added the overhead leaves, flying duck, and crane, as well from Wetlands 1 [DIGI790]. Because these were digital images, I was able to size them to exactly what size I wanted. I incorporated two of the images from Wetlands 2 [DIGI791]: the turtle on a log, and the lily pads. Once I had everything overlaid where I wanted the images, I printed the image onto white cardstock. I die cut out the image with a stitched rectangle die, and then busted out some distress inks and started blending in sunset colors and water colors. I wanted to highlight some of the waves on the water and make them sparkle in the evening sunlight. So, I pulled out my versatile and fun Sakura Glue Pen [Quicky] and traced along some of the waves. I sprinkled Ocean Semi-Transparent glitter [G1126] over the glue. Here is a closeup of the water.
Here is another image of the sparkly water and the lily pads, which I highlighted with Aqua Marine Semi-Transparent glitter [G1062], again using the Sakura Glue Pen [Quicky].

After my main image was done, I started on my frame. I adhered 3/4" Double-sided Tear-ific Tape [SAT05] on the edges of a rectangle, and then die cut an elaborate rectangle frame. The edges now had adhesive and the design cut into it! I peeled away the release tape for the sections that were inside the frame, and sprinkled Black Ice glitter [G1020] and burnished it in with my finger tool. Then, I revealed the rest of the frame, and sprinkled on Ocean Semi-Transparent glitter [G1126] over the rest of the adhesive and burnished it in! So pretty!
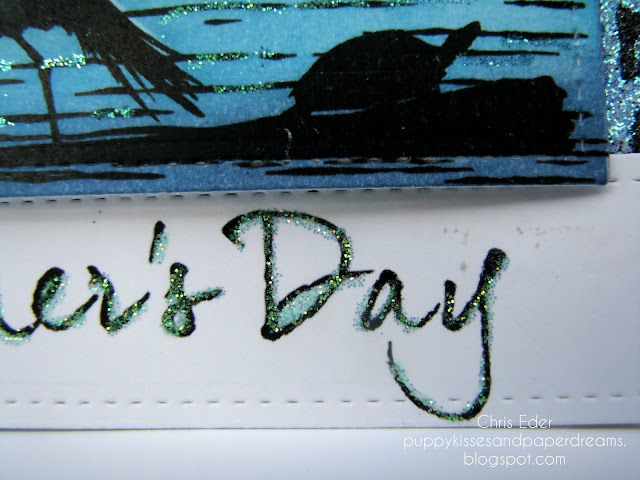
There are quite a few sentiments with these two stamp sets. I used the Happy Fathers Day sentiment from Wetlands 2 [DIGI791]. I printed it on white cardstock and die cut it out with rectangle die. Again, I used my Sakura Glue Pen [Quicky] and traced over the sentiment and then sprinkled Ocean Semi-Transparent glitter [G1126] over the words. Here is the first half of the sentiment.
Here is the second half of the sentiment.
Here is another shot of the sunset and frame. 
This was a really fun card to make. I love these silhouette images, and they are gorgeous. I can't wait to see what you make with these stamps too.


Thanks for stopping by, have a magical day! 

Chris

Wednesday, July 13, 2016

Sparkle N Sprinkle Christmas Skates card [07.13.2016]


Hi! This is a post for Sparkle N Sprinkle, which is one of the cards I made with Sparkle N Sprinkle's July reveal stamps. I am head over heels with these Christmas Skates from Sparkle N Sprinkle! It is so much fun to have Christmas in July, and this new stamp set is so pretty and so versatile.Here is my card using the Christmas Skates digital image [DIGI789]. 
I used the new Christmas Skates digital image [DIGI789] and sized the skates to fill a large card front. I also sized the sentiment fairly large. I printed these out on white cardstock, and die cut both with a stitched rectangle die. I also printed out a second image of the skates so I could fussy cut and layer one over the other for dimension, and to make the bottom skate burst out the edge of the rectangle, and burst the holly out of the top.

When I saw this skate stamp, I just had to have it and sparkle up those skates! It made me think of the Olympic skaters with their sparkly outfits. I first colored the skates with Copic markers, just to add some light gray shading around the edges and seams to make the white of the skate pop better. After coloring the skates, I covered the boot part of the skates with Brushable Glue [540] and sprinkled on Sparkling Snow Semi-Transparent Glitter [G1003]. I used the Brushable Glue [540] again on the skate blades, and sprinkled on Sonic Silver Velvet Glitter (microfine) [GM2002]. Here are the skates.

I also decorated the eyelets for the lace holes, and the lace hooks. I daubed on some adhesive with the Sakura Glue Pen [Quicky]. For the eyelets, I used the beautiful Ocean Semi-Transparent Glitter [G1126]. For the lace hooks, I used the perfect Sonic Silver Velvet Glitter (microfine) [GM2002]. These really added to the skates and made them even sparklier!  

Here is another angle of the skates and all the glitter!!!
I colored the holly and berries with Copic markers. I colored the holly on the card, and on the second image I printed. After coloring and fussy cutting the second image, I busted out the Sakura Glue Pen [Quicky] again, and added Glistening Emerald Sparkle N Soft [SS102] to the holly leaves and Burgundy Glitz [G1047] to the berries. I layered leaves and berries over the colored images on the card front to give some dimension. You can see the glitter and dimension here.
Here is a closeup of the holly leaves and berries and the dimension from the layers. 
For the sentiment, I colored the edge of the stitched rectangle with Copic markers, then brushed on Brushable Glue [540] and sprinkled on more Sparkling Snow Semi-Transparent Glitter [G1003]. I also used the Sakura Glue Pen [Quicky] again and added some glue to the snowflakes in the sentiment. More Sparkling Snow Semi-Transparent Glitter [G1003] was added to those sweet flakes to make them sparkly too!
This was a really fun card, and these skates are so pretty and fun! I LOVE them! Thanks so much for stopping by, have a magical day! 
Chris