Hi! Designer Chris with another card from Sparkle N Sprinkle's March release! Let's check out this card I made using the Amazing You - Paisley Elephant stamp set. I wanted to highlight the paisley print within the elephant, and also give it an antiqued feel. This is what I created with these ideas in mind. Let's check it out together!

Here is a close-up of all the layers and the Photoplay Rhapsody paper as one of the layers. It also shows the cracked Clear Detail embossing powder over the paisley elephant, the gold gilding flakes, super thick gold embossing powder and the distressing I did. More info below!

And, here is a shot of the distressed sentiment area. I stamped the sentiment using my Tonic Tim Holtz Stamp Platform. I inked up my stamp with Versamark ink, and stamped it. I sprinkled on Copper embossing powder and heat set it. Then, I distressed the edges and matted the sentiment with black cardstock. Here are those amazing Copper and Super Thick Gold embossing powders.

Now, a lot of information about how I created the card. I started out by stamping the elephant onto kraft cardstock, using the Tonic Tim Holtz Stamp Platform. I inked up the stamp with Versamark ink, and stamped it onto the paper. I kept the stamp in the stamp platform for the next step...

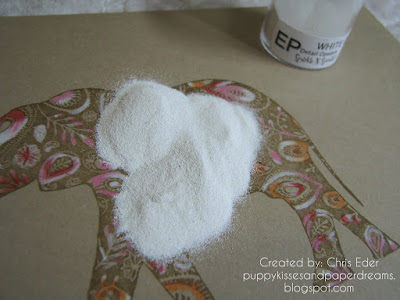
After I stamped the elephant with Versamark ink, I removed the stamped cardstock and colored the elephant with pink, orange, and white colored pencils. I placed the stamped image back inside my Tonic Tim Holtz Stamp Platform and inked up my stamp with Versamark ink again. I stamped it again, and then removed it and sprinkled on White Detail embossing power and heat set it. You can see in the image below how I colored the elephant (just some of the paisley pattern prints, and not all of them), and what it looked like before I put on the embossing powder. This really works for me - to color the image before I put on the embossing powder. Sometimes I bump up against embossing powder and knick it or knock it out of the way when I am coloring, so I have learned to stamp it again, and then emboss it after coloring ... a stamp platform really makes this easy to do!
After I did the White Detail embossing powder layer, I then did the Clear Detail "crackle" layer to make it look aged and antiqued. I die cut out the elephant stamped, colored, and embossed image with the Tonic Sunray Venus Layering Basics Die Set and my Tangerine machine (AWESOME!). Then, I inked up my entire card piece with Versamark ink, sprinkled on Clear Detail embossing powder and heat set it. I repeated this step about 10 times ... I kept inking up the image, dumping on Clear Detail, heat setting it, and repeating! I did this over and over so much that the elephant panel became pretty thick! Just what I wanted ... Then, I put it into the freezer and let it sit in there and chill for at least 10 minutes. Then, I took it out and cracked it by bending and twisting it several times. Here is a photo of it right after I did all the cracking. You gotta move fast too, because it won't crack once it is thawed. And, then to finish this layer off, I blended some brown ink over the top of the image to darken up the lines as well.

I wanted to add a lot of distressing to this card. I needed to add some texture to the entire card. I pulled out my Tonic Filigree Affections Idyllics Die and Embossing Folder Set. I inked up the inside of the embossing folder with a brown ink (but not perfectly), and then inserted my kraft cardstock panel into the folder and ran it through my Tangerine machine. The photo below shows the ink inside the embossing folder. This gave my kraft cardstock some texture and color and aged it a bit!

I distressed all the edges. I also die cut a piece of patterned paper from the Photoplay Rhapsody collection with another Sunray Venus Layering Basics Die Set. I also rolled on some Nuvo Smooth Precision Glue Pen onto the edges of the patterned paper layer, let it dry to tacky, then burnished in some Radiant Gold gilding flakes from Nuvo. This really pulled everything together! I layered everything up, sprinkled on some Super Thick Gold embossing powder and heat it from below (it is super chunky and will fly away if hit directly with the air from the heat gun.

This card was really fun to make and a departure from my comfort style. It was really fun to make a card with a lot of distressing and the Clear Detail embossing crackle. It is nice to step outside my comfort zone and try something new. I'm glad I did. I love this old, elegant elephant. Remember to post your amazing creations in Sparkle N Sprinkle's Creative Challenge on Facebook. The April challenge is open now, and closes on April 25. I can't wait to see what you create! And, remember to comment on my blog post here, and on this same post in the Sparkle N Sprinkle blog. To be eligible to win the $20 Sparkle N Sprinkle gift coupon, you have to comment on both blog posts!
Thanks for stopping by. Have a magical day!
-Chris
Sparkle N Sprinkle compensated links are used when possible.

Supply List:
Sparkle N Sprinkle Amazing You - Paisley Elephant [00-884P5]
Sparkle N Sprinkle Clear Detail embossing powder [EP280]
Sparkle N Sprinkle White Detail embossing powder [EP298]
Sparkle N Sprinkle Copper embossing power [EP236]
Sparkle N Sprinkle Super Thick Gold embossing powder [EP235]
Sparkle N Sprinkle Clear Detail embossing powder [EP280]
Sparkle N Sprinkle White Detail embossing powder [EP298]
Sparkle N Sprinkle Copper embossing power [EP236]
Sparkle N Sprinkle Super Thick Gold embossing powder [EP235]
Memento Tuxedo Black ink [VF-82]
Versamark Ink [VM-001]
Anti Static Bag [99512]
Mini Blender Brush Set [1558e]
Photoplay Rhapsody Collection Pack Free Spirit Paper [RH2456]
Tonic Sunray Venus Layering Basics Die Set [1450e]
Tonic Filigree Affections Idyllics Die & Embossing Folder [1516e]
Tonic Tim Holtz Stamp Platform [1707e]
Versamark Ink [VM-001]
Anti Static Bag [99512]
Mini Blender Brush Set [1558e]
Photoplay Rhapsody Collection Pack Free Spirit Paper [RH2456]
Tonic Sunray Venus Layering Basics Die Set [1450e]
Tonic Filigree Affections Idyllics Die & Embossing Folder [1516e]
Tonic Tim Holtz Stamp Platform [1707e]
Tonic Tangerine machine [138e]
Tonic 12" Wide Base Craft Guillotine [454a]
Tonic Easy Clean Craft Mat [1514e]
Nuvo Smooth Precision Glue Pen [206N]
Nuvo Radiant Gold Gilding Flakes [850N]
colored pencils
colored pencils
Here is a close-up of all the layers and the Photoplay Rhapsody paper as one of the layers. It also shows the cracked Clear Detail embossing powder over the paisley elephant, the gold gilding flakes, super thick gold embossing powder and the distressing I did. More info below!

And, here is a shot of the distressed sentiment area. I stamped the sentiment using my Tonic Tim Holtz Stamp Platform. I inked up my stamp with Versamark ink, and stamped it. I sprinkled on Copper embossing powder and heat set it. Then, I distressed the edges and matted the sentiment with black cardstock. Here are those amazing Copper and Super Thick Gold embossing powders.

Now, a lot of information about how I created the card. I started out by stamping the elephant onto kraft cardstock, using the Tonic Tim Holtz Stamp Platform. I inked up the stamp with Versamark ink, and stamped it onto the paper. I kept the stamp in the stamp platform for the next step...

After I stamped the elephant with Versamark ink, I removed the stamped cardstock and colored the elephant with pink, orange, and white colored pencils. I placed the stamped image back inside my Tonic Tim Holtz Stamp Platform and inked up my stamp with Versamark ink again. I stamped it again, and then removed it and sprinkled on White Detail embossing power and heat set it. You can see in the image below how I colored the elephant (just some of the paisley pattern prints, and not all of them), and what it looked like before I put on the embossing powder. This really works for me - to color the image before I put on the embossing powder. Sometimes I bump up against embossing powder and knick it or knock it out of the way when I am coloring, so I have learned to stamp it again, and then emboss it after coloring ... a stamp platform really makes this easy to do!

After I did the White Detail embossing powder layer, I then did the Clear Detail "crackle" layer to make it look aged and antiqued. I die cut out the elephant stamped, colored, and embossed image with the Tonic Sunray Venus Layering Basics Die Set and my Tangerine machine (AWESOME!). Then, I inked up my entire card piece with Versamark ink, sprinkled on Clear Detail embossing powder and heat set it. I repeated this step about 10 times ... I kept inking up the image, dumping on Clear Detail, heat setting it, and repeating! I did this over and over so much that the elephant panel became pretty thick! Just what I wanted ... Then, I put it into the freezer and let it sit in there and chill for at least 10 minutes. Then, I took it out and cracked it by bending and twisting it several times. Here is a photo of it right after I did all the cracking. You gotta move fast too, because it won't crack once it is thawed. And, then to finish this layer off, I blended some brown ink over the top of the image to darken up the lines as well.

I wanted to add a lot of distressing to this card. I needed to add some texture to the entire card. I pulled out my Tonic Filigree Affections Idyllics Die and Embossing Folder Set. I inked up the inside of the embossing folder with a brown ink (but not perfectly), and then inserted my kraft cardstock panel into the folder and ran it through my Tangerine machine. The photo below shows the ink inside the embossing folder. This gave my kraft cardstock some texture and color and aged it a bit!

I distressed all the edges. I also die cut a piece of patterned paper from the Photoplay Rhapsody collection with another Sunray Venus Layering Basics Die Set. I also rolled on some Nuvo Smooth Precision Glue Pen onto the edges of the patterned paper layer, let it dry to tacky, then burnished in some Radiant Gold gilding flakes from Nuvo. This really pulled everything together! I layered everything up, sprinkled on some Super Thick Gold embossing powder and heat it from below (it is super chunky and will fly away if hit directly with the air from the heat gun.

This card was really fun to make and a departure from my comfort style. It was really fun to make a card with a lot of distressing and the Clear Detail embossing crackle. It is nice to step outside my comfort zone and try something new. I'm glad I did. I love this old, elegant elephant. Remember to post your amazing creations in Sparkle N Sprinkle's Creative Challenge on Facebook. The April challenge is open now, and closes on April 25. I can't wait to see what you create! And, remember to comment on my blog post here, and on this same post in the Sparkle N Sprinkle blog. To be eligible to win the $20 Sparkle N Sprinkle gift coupon, you have to comment on both blog posts!
Thanks for stopping by. Have a magical day!
-Chris
Sparkle N Sprinkle compensated links are used when possible.
Wow, love all the distressing features going on here Chris. Really results in a great look.
ReplyDeleteFabulous card Chris...love all the detail you put into it...great use of all those fun products!!
ReplyDelete