Friday, March 30, 2012

Baby Kellen (03/28/2012)

Hi! You have got to meet today's card ... here it is!


Our friends have a new baby boy, little Kellen.  I made him a card using Technique Tuesday's Zoology set.  I stamped the animals on different colored papers and fussy cut them.  I used my Fiskar's Grass Border Punch to cut out the grass.  I used the "Wild" and "About" from the Zoology set, but used Lawn Fawn's  fantastic Harolds ABCs to spell out Kellen. I layered everything up, and had a cute little baby boy card.

I also stamped "Welcome to the HERD" inside the card.  I hope little baby Kellen and his parents like it!

Thanks for stopping by, have a magical day!

Chris

Wednesday, March 28, 2012

Happy Anniversary Card (03/28/2012)

Howdy, let's get right to it, and meet today's card.  I cut a lot of card dies at Stampadoodle recently, and have used them as a starting point for some cards I have done, so here is another "three-panel" card which may look familiar:


I wanted to keep this as monochromatic as possible.  Terri really likes cows, so I envisioned some holstein-esque cows and used black as my main color and background color to stay within the color scheme.  I used a black floral patterned paper from my stash for the cows.  You can't really tell it is floral can ya?  It worked out really well I think :) 

I used Lawn Fawn stamps again (love them!), and used both Quinns ABCs for the sentiment, and Critters on the Farm for the cows.  I hand-cut a bow tie for the boy cow and made a little bow from red and white bakers twine from my stash for the girl cow.  I had a left over heart that I cut out with a Cuttlebug die cut at Stampadoodle at my last crop.  (Remember to save everything ... ya never know when you are going to need them!)

I backed the three panels with a soft polka dot pink which fit the theme too, and adhered some silver glitter tape across the bottom to anchor the sentiment.  I stamped the sentiment with Quinns ABCs, and heat embossed with white.  I fussy cut out the letters and adhered the words.

Overall, easy-peasy, and fun.  I know black isn't a traditional anniversary card color, but this one spoke to me, and I think Terri will enjoy it.  Fingers crossed :)


Thanks for stopping by, have a magical day!
 
Chris

Monday, March 26, 2012

Happy Birthday Dad (03/26/2012)

Meet today's card:  My Dad's birthday was last week, and here is the card that I made for him ... I don't exactly what to prejudice your thoughts about it - but there are some things I like about it, and some I don't.  Without further commentary, here is his card:


So, as promised, here are some things I LIKE and some things I DON'T LIKE about this card:
  • I LIKE the blue suede paper birthday cake (Dad's favorite color is BLUE ... and ya can't go wrong with "Blue Suede Shoes," I mean Cake)
  • I LIKE the chocolate polka dotted ribbon across the bottom, a ribbon from my stash
  • I LIKE the background paper behind the three square cutouts.  I made this card using an Accucut Die Cut at my favorite local, Mom & Pop stamp store: Stampadoodle.  Wendy & Steve, the owners, are incredible, as are all their employees. Shout out to all the girls, especially Laurie!!
  • I LIKE the little diamond pop-up of Happy Birthday.  I happily pulled out my absolutely favorite stamp company, Lawn Fawn, and used their Bake Me a Cake set for both the sentiment and the paper-pieced cake.  Then, I highlighted the words with some bronze glitter glue.  Here is a close up of the sentiment:

  • I LIKE the "dad" in the three "windows" of the card.  I used Lawn Fawn's Quinns ABCs (another absolute fave of mine!) and heat embossed the sentiment with black embossing powder, and then filled each letter in with a white glitter glue
  • I DON'T LIKE that I feel inept with making a masculine card.  I feel like this card is too plain and needs MORE - especially in the upper right area or across the top.  If this were a non-masculine card, I'd fill it with ribbon, rhinestones, a flower or butterfly or something ... but those just don't seem to fit the bill on this card
So, what do you think?  I will continue to hone my skills on masculine cards - good thing I don't make them every day though :) 

And, I hope my Dad likes this card.  Happy Birthday Dad!  Here's hoping your special day was fabulous :)

Thanks for stopping by, have a magical day!

Chris


Friday, March 23, 2012

Happy Birthday Maeg (03/23/2012)

Welcome back ... let's get on with it right away, meet today's card:


Might be a little hard to tell from this angle, but the three levels of grass are really an accordion-type step so each layer of grass is in front of the layer behind it.  I used my favorite stamps from Lawn Fawn.  They have such fun stamps.  I used Critters in the 'Burbs and Bake Me a Cake

I made the card with sparkly yellow paper.  I attached the accordion-folded grass base, then stamped the critters, butterfly and tree and colored them with my Copic markers.  I needed a little something at the top of the card, to balance it since the bottom had so much going on - so I glued on a bright orange/yellow rosette to kind of be the sun shining down on the happy critters. 

Overall, simple, fun and silly.  Happy Birthday Maeg!

Thanks for stopping by, have a magical day!

Chris

Wednesday, March 21, 2012

Welcome Dave (03/21/2012)

What a happy day ... and we need a happy project, which isn't really a card - but it has all the elements (patterned paper, stamps, ink, adhesives oh my!). 

I made some brownies to welcome a new team member to one of my projects at work, and wanted to jazz up the plate o' brownies ... so I pulled out my favorite Quinns ABCs from Lawn Fawn, and started stampin' and embossin' and cuttin' and made this for him:


I stamped the letters on patterned paper, heat embossed them in black, then fussy cut out the letters.  Then, I adhered each letter to a toothpick and them stuck the toothpicks into the brownies.  Simple, fun and festive!

Dave said the brownies were good, and I sure had fun making them and the sentiment :)

Thanks for stopping by, have a magical day!

Chris

Monday, March 19, 2012

You're Just Ducky (03/19/2012)

Who doesn't love rubber duckies?  I always hear Ernie, "'Rubber Ducky, You're the One" in my head when I see them, and they make me happy.  My good buddy Terri gave me some stamped images of rubber duckies and we Copic marker colored them ... and since Terri is awesome, I just had to make her a Thank You card using the duckies.  Here it is:


I used my Lifestyle Crafts Nesting Frames to cut out the ducky image and framed it with a solid blue die cut label as well.  I used the Core'dinations cardstock for the blue cardstock paper.  I dry embossed it with my Cuttlebug Spots and Dots folder and then lightly sanded the raised image to release the paper's core color (lighter blue).

I wrapped the blue cardstock panel with a light blue ribbon (the photo makes it look more gray than it really is, sorry about that!) and  corner rounded the right edges of both the panel and the card.  Then, I tossed on a sticker sentiment label with a little bit o' bling and was done!

Terri is just ducky and she deserves much more than this!  This was a very fun card to make, and it makes me smile whenever I see it or think about it :D

Thanks for stopping by, have a magical day!

Chris

Friday, March 16, 2012

Mele Kalikimaka card (03/16/2012)

I know it isn't the season ... but here is a Mele Kalikimaka card I made to celebrate the winter holidays!  I love this paper from Island Paperie.  They have such an amazing collection of hawaiian themed paper, die cuts, stencils and embellishments.  I just go a little crazy each time I go to their store on the Big Island.  I haven't been to their main Maui store - but another reason to visit Maui eh?


But enough about the great state of Hawaii and back to my card.  The Mele Kalikimaka paper had elements of green, pink and orange in it (perfect combination!) so I pulled up those elements with solid cardstock and embellishments!  I like this color combination for winter holidays much more than traditional red and green (even though there is some of that in this card too - I could have gone either way, but I can't say no to pink and orange!).

I cut the hibiscus (one of my favorite flowers!) with my Silhouette electronic cutter, and gave the flower a little dimension with inked edges and sparkly rhinestones.

The sentiment "Mele Kalikimaka & Hau'oli Makahiki Hou" is Hawaiian for Merry Christmas and Happy New Year.  I added a few sparkly rhinestones to finish off the bottom of the sentiment because I felt like I needed more shiny things on this card.  And, I inked the edges of the card itself too. 

This was a fun card to make, and it makes me wistfully think about Hawaii and when I can visit it again....

Thanks for stopping by, have a magical day!

Chris

Wednesday, March 14, 2012

Happy Anniversary rosettes (03/14/2012)

Hi!  Today's card is not really a card, in the traditional sense, but it is a large rosette with other rosettes.  This at least conveys a message right?  Close enough to a card :)  I am in a rosettes phase, and here is what I made to celebrate two very special people's anniversary.  I was honored to do one of their wedding albums years ago when they got married, and I still had the paper, which I incorporated into this anniversary "card."  And, I used the amazing Lawn Fawn Quinn's ABCs, one of my absolute favorites for the sentiment.  Here it is:


Okay, apparently I don't know (yet!) how to rotate an image in a blog post.  So, maybe just lean a little to your right to see what it looks like to get the idea :) 

I clear embossed and fussy cut out the stamped Lawn Fawn Quinn's ABCs letters, and adhered them to a large circle.  I used pearls to dot the "i"s in their names.  It is hard to tell, but I cut out a large "&" in vinyl with my Silhouette (love it!), and added that on the cardstock circle before I adhered any of the words.  I layered on a few other rosettes to add depth and color, and was done.  It is also hard to tell in this photo (sorry for the poor quality!) but the background rosette was from a 12"x12" and the rosette is 12" across.  I also used a border punch all around the edge of the large rosette for a little extra flair. 

Thanks for stopping by, have a magical day!

Chris

Monday, March 12, 2012

Happy Valentine's Day Treat Box (03/12/12)

Hello!

I brought some vegan chocolates to Tails A Wagging, our amazing and wonderful local doggie day care and training company (where our awesome dog, Cooper, has Agility training) to celebrate Valentine's Day.  Cooper goes for doggie day care whenever there is space in the "littles" and he is on the waitlist for a permanent spot.  Anyhoo, Angi, the owner, is absolutely incredible, as well as her entire staff, and I wanted to bring them a little something.  They are all vegan, and during my last visit to Seattle I got a couple of vegan chocolates to give them as a giftie, so I whipped up this treat box to share the candies in.


I die cut a box (from the die cuts at Stampadoodle), layered two rosettes together, and fussy cut around the sentiment stamped on blue cardstock.  Adhered all that together, stuffed in some crinkle stuffing, and nestled the chocolates inside.  Easy peasy!

I like to have some quick things like this ready - so whenever I use the die cutting system at Stampadoodle, I usually end up cutting a few more boxes of random sizes and colors to have on hand at home.  This box is an outgrowth of that - as I was pulling out the chocolates and figuring out how to "present" them to Angi, I remembered I had some die cut boxes and bags, and dashed off to my craft closet, pulled out my "scrap bag" and found this box.  With the addition of the rosettes and sentiment, it became "Valentiney" enough, and worked perfectly!

Thanks for stopping by, have a magical day!

Chris

Friday, March 9, 2012

Just Keep Swimming (03/09/2012)

Hi! Meet today's card - it is a card honoring one of my favorite Hawaiian animals, the Honu (green sea turtle).  Here it is:


I borrowed Dory's advice, and used the sentiment "Just Keep Swimming" which she says in "Finding Nemo" (one of my favorite Pixar movies! and one of my favorite shows at Walt Disney World's Animal Kingdom!).  I stamped two honu from Island Paperie Nesting Petroglyph set, paper pieced the shell on the larger honu, then embossed both honu with gold.  I created the waves with some of Island Paperie's gorgeous paper.

This card makes me so happy.  I love Hawaii and seeing honu on the beaches or paddling along in the water.  Beautiful, wonderful animals!

Thanks for stopping by, have a magical day!

Chris

Wednesday, March 7, 2012

Circles & Thank Yous (03/07/2012)

Howdy!  I feel like I am always in need of Thank You cards, so I made up a passel of them using Spellbinders Circle dies.  Here is one of them:


I used several colors of "sugar" (glitter) paper in neon-ish colors, and layered the circles together on a black card.  I stamped the sentiment in a circle as well, and inked the edges with Distress Ink.

Super simple, and super fun - and now I have a stash of Thank You cards for those times when I need to dash off a quick thank you card and don't have time to make one.

Thanks for stopping by, have a magical day!

Chris

Monday, March 5, 2012

Mahalo card (03/05/2012)

Today's card is another "try the technique" that I saw at the weekly Demo at Stampadoodle.  Suzie, at Stampadoodle, showed us ideas of how to use black paper.  I love black paper, and really learned a lot from her demo.  She showed us how to use Pearl Ex powder, which is what I used here (in silver).


I made a card with green sparkle paper, and I used the Pearl Ex powder, after using Versamark ink with Stampin' Up Paradise stamps and used my Creative Memories square punch to punch out the images.  And, I stamped the "Mahalo" sentiment the same way.  I "corralled" the stamped images and framed them with yellow paper, and used the same paper to mat the sentiment.

Pearl Ex powder comes in all colors.  It works on all colors of paper, but the silver really pops on the black.

Thanks for stopping by, have a magical day!

Chris

Friday, March 2, 2012

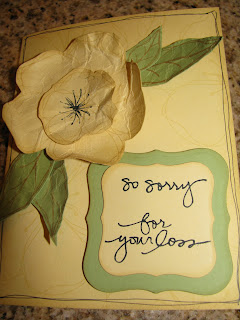
Sympathy card (03/02/2012)

Howdy!  Today's card is a sympathy card that I made. 

I wanted something simple, but layered, so I used a technique of stamping an image, then crumpling the paper and somewhat smoothing it back out.  I layered flowers together to build a fuller, petaled flower.  Here it is:


I used Technique Tuesday stamps, and Spellbinders dies to make the label.

Thanks for stopping by, have a magical day!

Chris