Monday, December 31, 2018

Santa Cookies

Today's project are some Santa cookies I made .... Just had to share these :) My friend, let's call her Jody, bakes a LOT and is an amazing cook and baker. She made some amazing cookies recently and I asked her to teach me how to make the Santa cookies. So, being the awesome person that she is, she invited me over and supplied all the goodies. I brought two boxes of Nutter Butters, and we made these Santas!

To make these, melt white melting chocolate and dredge the bottom half of the nutter butter through the melted white chocolate, place a cinnamon dot as the nose, set them aside on wax paper. Once all of the Santas have their beard and nose, dredge the top half of the nutter butter through white melting chocolate again, and then scrape off most of the white chocolate above the wide part of the nutter butter. Immediately dredge the hat part through red sparkling sugar and set aside. Then, dab a drop of white melting chocolate onto the base of a white chocolate chip and place it onto the hat for the tassel. To finish off the cookies, melt a few mini chocolate chips and then dab a drop of melted chocolate chips onto the base of two mini chocolate chips and place them for the eyes. Easy peasy!

So easy ... right? Here are two FUN fails! Or, as they say, "Nailed it!" Yep, sometimes one can make some mistakes :) But, they still tasted good, so it doesn't matter if I have a cross-eyed Santa or a three-eyed Santa. It all tastes the same!

These were really fun to make, and I can't wait to make some more for upcoming holidays ... my friend "Jody" is willing to host me again for more cookie making shenanigans :) THANKS Jody!

Thanks for stopping by. Have a magical day!

-Chris

Sparkle N Sprinkle compensated links are used when possible.

Sunday, December 30, 2018

Sparkly Unicorn Birthday card

Happy day! I made this magical unicorn card for my niece's birthday. She likes horses, and her favorite color is blue. So, I made a blue magical unicorn :) Let's peek at the card, shall we?

Supply List:
Pinkfresh Studio Magical Unicorn stamp set
Pinkfresh Studio Magical Unicorn die set
Lawn Fawn Moonstone ink
Sparkle N Sprinkle Royal Blue embossing powder
Sparkle N Sprinkle Sparkle embossing powder
Nuvo Aqua Shimmer Glitter Gloss pen
Lawn Fawn Gift Card Pop-Up lawn cut
Versamark ink [VM-001]
Anti Static Bag [99512]
Versafine Onyx Black ink [VF-82]
Nuvo Deluxe Adhesive [200N]
Nuvo Smooth Precision Glue Pen [206N]
Tonic Tangerine machine [138e]
Tonic Easy Clean Craft Mat [1514e]


I started out by laying out the die cuts onto a piece of cardstock to "size" where I wanted things to be. Then, I masked off the area that the ears and the face would be with trimmed post-it notes so I didn't stamp in those areas. I then stamped the star cluster from the Magical Unicorn stamp set, using Lawn Fawn's Moonstone ink. I stamped the star clusters all around the background of the card. I also stamped out the unicorn horn with Versamark Ink and sprinkled on Sparkle N Sprinkle Royal Blue embossing powder. I heat set it and then die cut the horn with my Tonic Tangerine die cutting machine. I also die cut the ears, flowers, and leaves with the coordinating dies. I swiped the ears with Versamark ink and sprinkled on Sparkle embossing powder from Sparkle N Sprinkle. I heat set these as well. I layered up the ears, horn, flowers and leaves (which I had also stamped with coordinating ink colors from my stash), and adhered everything down using adhesive and foam adhesives for some dimension. I stamped the eye lashes and sentiment with Black Onyx ink and then sprinkled on more Sparkle embossing powder and heat set it.

I stamped a sentiment inside the card using Versamark ink and sprinkled on more Royal Blue embossing powder and heat set it. Here is a close-up of the inside sentiment.

And, because my niece wants Costco cash cards for her birthday and Christmas (since she is saving up for a very specific camera at Costco), I made a gift card holder using Lawn Fawn's Gift Card Pop-up lawn cut. I adhered the gift card popup to the inside of the card, and slipped in the Costco gift card.

I think she will love this card, I sure hope so. Happy Birthday to my sweet Hannah!

Thanks for stopping by. Have a magical day!

-Chris

Sparkle N Sprinkle compensated links are used when possible.
This blog post first appeared on Sparkle N Sprinkle's blog.

Friday, December 28, 2018

Mahalo Totally Tropical floral card

I stamped out the Totally Tropical stamp set by Alt E New, and also used masking to layer the hibiscus and yellow plumeria together, with the leaves surrounding them. I also stamped and masked the leaves at the bottom of the card too.

Supply List:
Alt E New Totally Tropical stamp set
Nuvo Aqua Shimmer Glitter Gloss pen
Mica watercolor set
colored inks
Bossy Joscie Crafty Goods Handcrafted By personalized stamp


I stamped the Mahalo sentiment using my Stamp Platform, and stamped in with two colors to give it some gradience. I also swiped on some Nuvo Aqua Shimmer Glitter Gloss pen over the sentiment as well. Then, I pulled out some Mica gold watercolor from my stash, and flicked gold watercolor paint onto the cardfront.

I also swiped some Nuvo Aqua Shimmer Glitter Gloss pen over the hisbiscus image. I also swiped more gold watercolor along the edges of the card panel. I layered it onto a blue cardstock base, and the card was done!

This card was so much fun to make, and it came together pretty easily since I used the layering stamp set to color in all the images, and my Stamp Platform. A bit of splatter and a swipe of glitter pen, and it was done. I love tropical florals, so this stamp set will get used quite a bit!

Thanks for stopping by. Have a magical day!

-Chris

Sparkle N Sprinkle compensated links are used when possible.

Wednesday, December 26, 2018

Hibiscus You are Fabulous Thank You card

Today's card is a thank you card for a dear friend. I stamped out WPlus9's Hibiscus Bouquet and used the WPlus9 Fierce and Fabulous sentiment. Let's check out this card.

Supply List:
WPlus9 Hibiscus Bouquet clear stamp
WPlus9 Fierce and Fabulous clear stamp
Sparkle N Sprinkle White Detail embossing powder
Sparkle N Sparkle Sparkle embossing powder
Nuvo Aqua Shimmer Glitter Gloss pen
Lawn Fawn Reveal Wheel Sentiments stamp set
Lawn Fawn Gift Card Pop-up lawn cut
Bossy Joscie Crafty Goods Handcrafted By personalized stamp
Memento Tuxedo Black ink
Tonic Tangerine machine


I used the Stamp Platform to stamp out the Hibiscus Bouquet image with Memento Tuxedo Black ink, which is Copic friendly. I colored the images with Copics, and then stamped them again with Versafine Black Onyx ink. Then, I sprinkled on Sparkle N Sprinkle's Sparkle embossing powder and heat set them. Then, I stamped the Fierce and Fabulous sentiment using Versafine Black Onyx ink. I swiped some Aqua Shimmer Glitter Gloss pen across the flowers to give them a little extra sparkle!

I stamped a lot of thank yous inside the card. My dear friend is fluent in several languages so I thought these thank yous would be so much fun! I used different colored inks too. And, I also used Lawn Fawn's Gift Card Pop-Up to die cut a gift card holder, which I adhered inside the card so I could slip in a thank you gift card.

I love this stamp set, and will definitely be making lots of cards with this Hibiscus Bouqet. It is gorgeous!

Thanks for stopping by. Have a magical day!

-Chris

Sparkle N Sprinkle compensated links are used when possible.

Tuesday, December 25, 2018

Happy Holidays Tags

Hello! I made some holiday tags and I am also entering them into the Lawn Fawnatics Challenge: Wonderful Winter. Let's check out these tags:

Supply List:
Lawn Fawn Say What? Christmas Critters stamp set
Lawn Fawn Say What? Christmas Critters lawn cuts
Lawn Fawn Tag, You're It lawn cuts
Lawn Fawn Perfectly Plaid Chill Petite Paper Pack
Lawn Fawn Stitched Hillside Borders lawn cuts
Lawn Fawn Stitched Rectangles lawn cuts
Lawn Fawn Jet Black ink
Lawn Fawn lawn trimmings
Lawn Fawn patterned paper
Sparkle N Sprinkle Sparkle embossing powder
Sparkle N Sprinkle Super Thick Silver embossing powder
Sparkle N Sprinkle Christmas Green embossing powder
Sparkle N Sprinkle White Detail embossing powder
Nuvo Aqua Shimmer Glitter Gloss Pens
Tonic Tangerine machine


I stamped out the images using my Stamp Platform and Lawn Fawn's Jet Black ink, which is Copic friendly. I colored the images with Copic markers. Then, I placed them back inside the Stamp Platform and stamped them again, with Versafine Onyx Black ink. And then I sprinkled on Sparkle N Sprinkle's Sparkle embossing powder and heat set it. This gave the images a bright black line again. And then I die cut them with the matching lawn cuts and my Tonic Tangerine die cutting machine.

I also die cut some tags using Lawn Fawn's Tag, You're It die for the background. I also die cut some of the papers using Lawn Fawn's Stitched Hillside Borders lawn cuts to give the tag some background and grounding.

I also stamped sentiments on the tags with Versafine Black Onyx ink and sprinkled on Sparkle embossing powder and heat set them.

I swiped my Anti Static Bag on the for the sentiment, placed my Lawn Fawn Say What? Christmas Critters sentiment bubble stamp inside the Stamp Platform, and stamped out the image using Versamark Ink. I sprinkled on Sparkle N Sprinkle's Christmas Green embossing powder. I did a double layer of the embossing powder, and then stamped the sentiment over it, with Versamark ink and sprinkled on Sparkle N Sprinkle's White Detail embossing powder and heat set it. I also sprinkled on some Sparkle N Sprinkle's Super Thick Silver and heat set it from the bottom, for some extra sparkle for the unicorn. I also die cut out a frame with Lawn Fawn's patterned paper, using the Tag, You're It tag lawn cut, and put a Stitched Rectangle inside to create the frame. I tied up all the tags with some Lawn Fawn lawn trimmings from my stash. I also swiped some Nuvo Aqua Shimmer Pen on the images.

These are such fun tags. I used them for some gifties for my co-workers and they really make me happy! Happy Holidays to you and yours.

Thanks for stopping by. Have a magical day!

-Chris

Sparkle N Sprinkle compensated links are used when possible.

Wednesday, December 19, 2018

Sparkle N Sprinkle Puppy Love Valentine's Day card

Today's card is a card using Sparkle N Sprinkle's December release, called Puppy Love. It is such a sweet stamp set!! I used the digi stamp version , and I also die cut the card panel using the Swirling Frame Layering Tonic Die and some tear-ific tape and glitter. Let's check out this fun card.

Supply List:
Sparkle N Sprinkle Puppy Love digi stamp set [DIGI3146M]
Sparkle N Sprinkle Raspberry Soda glitter [G1052]
Sparkle N Sprinkle Tooth Fairy glitter [GM2036]
Sparkle N Sprinkle Frosted Carmine [GM2011]
Sparkle N Sprinkle Golden Wheat [GM2026]
Sparkle N Sprinkle Sparkling Snow [G1003]
Sparkle N Sprinkle 3/4" Tear-ific Tape [SAT05]
Sparkle N Sprinkle Mini Wobbler [AWS12]
Sparkle N Sprinkle Dimensional Glue [539]
Sparkle N Sprinkle Glitter Brush [SG1400]
Nuvo Smooth Precision Glue Pen [206N]
Nuvo Deluxe Adhesive [200N]
Nuvo Aqua Shimmer Glitter Gloss Pen [888N]
Tim Holtz Glass Media Mat [1914e]
Tonic 12" Advantage V Blade Trimmer [159e]
Tonic Swirling Fame Layering Die Set [1462e]
Tonic Tangerine machine [138e]


This puppy makes me so happy! I sized the digital image, using my computer in a word program. I sized the puppy, then sized the balloons and layered them behind the pup! This is one of the things I love most about digi stamps - you can make them any size you want and put anything in the foreground or background. So much fun! After everything was sized to what I wanted, I printed two copies of the image, onto white cardstock, using my color ink jet printer. I fussy cut out one of the pups. I rolled on some Nuvo Smooth Precision Glue Pen to the hearts on the pup's shirt, and sprinkled on Frosted Carmine glitter. I also drew a bit of glue pen onto the pup himself, and sprinkled on Golden Wheat glitter. I swiped some Nuvo Aqua Shimmer Glitter Gloss Pen onto his nose and eyes, and then covered both with a squeeze of Sparkle N Sprinkle Dimensional Glue. I mounted this pup onto a Mini Action Wobbler and adhered it onto the card panel.

For the big heart, I had also sized the sentiment onto the balloon heart. I squeezed on some Dimensional Glue onto the exclamation point, and sprinkled on Sparkling Snow glitter. I rolled on more Nuvo Smooth Precision Glue Pen onto the heart for some accents, and sprinkled on Tooth Fairy glitter. This gave the heart a little extra pop!

I also decorated the image. I die cut it with Tonic's Swirling Frame Layering Die Set and then layered some 3/4" Tear-ific Tape behind the edge. I pressed Raspberry Soda glitter into the tear-ific tape which adhered to the adhesive that appeared through the frame edge. I burnished in the glitter with my finger tool and then dusted off the unadhered glitter with my Glitter Brush. This really made the white cardstock pop too, and is such a fun and easy way to add a lot of sparkle to the card! I layered this over a pink cardstock and fussy cut it to have the pink just peek out of the edges. I layered all of this over a black card base.


This was a really fun and easy card to make. Those digi stamps really make it easy - and I used the pre-colored digi image as well, so I didn't have to spend any time coloring, I just got to decorate and have fun! I know you will love this sweet Puppy Love stamp set. You gotta get it - perfect for our upcoming Valentine's Day!


And, this is my last post for Sparkle N Sprinkle. It has been an absolute pleasure and honor being on this company's Design Team since 2015. I cherish the memories I made with these amazing gals. I miss you all, already!

Thanks for stopping by. Have a magical day!

-Chris

Sparkle N Sprinkle compensated links are used when possible.
This blog post first appeared on Sparkle N Sprinkle's blog.

Sunday, December 16, 2018

Simply Celebrate Winter card set

I made a set of cards, using Lawn Fawn's Simply Celebrate Winter stamp set and matching lawn cut dies. I also used Stitched Rectangles and Lawn Fawn's Really Rainbow Christmas patterned papers.

Supply List:
Lawn Fawn Simply Celebrate Winter stamp set
Lawn Fawn Simply Celebrate Winter lawn cuts
Lawn Fawn Really Rainbow Christmas patterned papers
Lawn Fawn Large Stitched Rectangle Stackables lawn cuts
Lawn Fawn Toboggan Together stamp set
Lawn Fawn Trim the Tree stamp set
Lawn Fawn Say What? Christmas Critters stamp set
Lawn Fawn Cozy Christmas stamp set
Lawn Fawn Winter Scripty Sayings stamp set
Lawn Fawn Sweet Christmas stamp set
Copic markers
Nuvo Aqua Shimmer Glitter Gloss Pens
Lawn Fawn Jet Black Ink Pad
Tonic Tim Holtz Stamp Platform [1707e]
Tonic Tangerine machine [138e]
Tonic Easy Clean Craft Mat [1514e]


I stamped out the Simply Celebrate Winter images using my Tim Holtz Stamp Platform, and Lawn Fawn's Jet Black ink, which is a Copic friendly ink. I colored the images using a rainbow assortment of Copic markers. Overall, I kept the coloring simple (without shading) and colored everything in rainbow order. I used the Simply Celebrate Winter lawn cuts and my Tonic Tangerine machine to die cut out each image. I popped them up with foam dimensionals and adhered them to white cardstock that I die cut with the Lawn Fawn Large Stitched Rectangle Stackables. I matted each rectangle with a coordinating color of solid cardstock, and layered this onto assorted Lawn Fawn's Really Rainbow Christmas patterned paper, in the 12x12 size. I layered these onto a cardbase, and the cards were done! Super easy and fun to whip these out!

Here is a close up of the ornament strip. I used a lot of Lawn Fawn stamp sets (see above) to stamp out sentiments on each card panel. I stamped these in the Lawn Fawn Jet Black ink as well. And, I covered certain parts of each image with Nuvo Aqua Shimmer Glitter Gloss pens to make those parts sparkle!

Here is the row of the houses. LOVE them! I sparkled up the snow on the roofs and the doors and windows.

These sweet snowmen are so cute! I used rainbow colors for their scarves and ear muffs. So sweet!

And, here is the box I made. I created a belly band and used more Lawn Fawn patterned paper from my stash.

I am also entering these into the Lawn Fawnatics Winter Holiday card challenge. These were really fun to make, and they actually came together pretty quickly.

Thanks for stopping by. Have a magical day!

-Chris

Sparkle N Sprinkle compensated links are used when possible.
This blog post first appeared on Sparkle N Sprinkle's blog.

Wednesday, December 12, 2018

Sparkle N Sprinkle Violets For You Shaker Ornament

Today's project is a shaker ornament, using the new Violets For You, one of the stamps in Sparkle N Sprinkle's December release. This stamp set has a gorgeous image of a violet plant in a pot, a stand alone violet and leaves, and a sweet butterfly. Let's check out what I made, using this gorgeous stamp set!

Supply List:
Sparkle N Sprinkle products:
Violets for You stamp set [00-925P5]
Sparkle [EP107]
Amethyst [EP199]
Royal Purple [EP275]
White Detail [EP298]
Super Thick White [EP355]
Wisteria [EP358]
Tiger Orange [GM2003]
Peruvian Lily [GM2014]
Gecko [GM2045]
Purple Fig [GM2047]
Caspia Sea [GM2048]
Butterscotch [GM2051]
Clear Embossable Acetate [99602]
Anti Static Bag [99512]
3/4" Tearific Tape [SAT05]
Brushable Glue [540]
Glitter Brush [SG1400]

Other products:
Tim Holtz Media Tool Set [2124e]
Tim Holtz Glass Mat [1914e]
Tonic 12" Advantage V Blade Trimmer [159e]
Tonic Tangerine [138e]
Tonic Clematis Vine Simply Screens [1047e]
Tonic Mixed Edge Oval Layering Basics Die Set [1456e]
Nuvo Gold Coast Glitter Drops [770N]
Nuvo Deluxe Adhesive [200N]
Nuvo Smooth Precision Glue Pen [206N]
Hai Round Embossed Sequins [Q6-001]
Hai Rainbow Rhinestones [SEQM-015]
Hai Diamonds Sequins 3mm [Q3-006]
Versamark ink [VM-001]
Versafine Black Onyx ink [VF-82]


I stamped the image onto Embossable Acetate. I used my Tim Holtz Stamp Platform. I treated the acetate with my Anti Static Bag and inked up my stamp with Versafine Black Onyx ink. I stamped the image onto the acetate, sprinkled on Sparkle embossing powder and heat set it. The Sparkle embossing powder is clear with sparkly glitter. It is so much fun, and packs an extra punch from just Clear embossing powder. I use it a lot! After stamping and heat embossing, I turned my stamped acetate over, and painted on some Brushable Glue to the backside of the stamped image. I brushed glue on the leaves area, then sprinkled on Gecko glitter. After it dried, I brushed on Brushable Glue to the violets. I brushed the "inside" of the petals and sprinkled on Caspia Sea glitter. Then, I did the outer edges of the violets by brushing on more glue and sprinkling on Purple Fig glitter. I  used Butterscotch glitter for the inner part of the flowers. For the pot, I sprinkled on Peruvian Lily and Tiger Orange. The sentiment was heat embossed with Royal Purple, after treating some cardstock with the Anti Static Bag, and stamping it with Versamark ink.

I created a shaker by die cutting ovals using the Mixed Edge Oval Layering Basics Die set from Tonic, using fun foam. I layered these ovals together to create the "height" for the shaker. I die cut an oval from cardstock (without the "inner" part cut out) and used it for the back of the shaker. I layered the oval fun foam and adhered them together with Nuvo Deluxe Adhesive. For the top layer, I die cut another oval, with the "inner" part cut out, from chipboard. I inked up the chipboard with Versamark Ink, and sprinkled on White Detail embossing powder and heat set it. I did this several times to get a solid coat over the chipboard. Then, I stamped the butterfly with Versamark Ink all around the oval frame, and sprinkled on Wisteria and Amethyst embossing powders to create lots of butterfly images on the frame. I sprinkled on some Super Thick White in random places and heat embossed it. I did this just to give some extra depth to the images and background. I also stamped out some butterflies on patterned paper and heat embossed them with the Wisteria and Amethyst embossing powders. I fussy cut those and layered them around the frame too. I used an assortment of HAI sequins for the shaker bits. This photo shows several of them.

Here is another view of the ornament. When I finished it, I squeezed on some Nuvo Gold Coast Glitter Drops. And, as I finished off the ornament, I thought I needed something a bit more. So, I die cut some green cardstock using the Clematis Vine Simply Screen. I rolled on some Nuvo Smooth Precision Glue Pen and sprinkled on some Gecko glitter. I layered these vines under the frame to give the ornament some extra flair.

I really like that this beautiful stamp set can be used in many ways, including making an ornament or wall hanging! I look forward to seeing what you create - make sure to enter your creations in the Sparkle N Sprinkle Creative Challenge, found both on our blog and on Facebook.

Thanks for stopping by. Have a magical day!

-Chris

Sparkle N Sprinkle compensated links are used when possible.
This blog post first appeared on Sparkle N Sprinkle's blog.

Wednesday, December 5, 2018

A Big Birthday Wish Mobile

Hi! One of the December stamp releases for Sparkle N Sprinkle is A Big Birthday Wish, which is fantastic! I love big, bold sentiments and this one delivers! And we all need birthday stamps. Just sayin'. I wanted to do something a little different for this birthday wish, so I created a mobile, and made all the parts involved, by printing out digi paper and die cutting shapes. Let's check it out!

Supply List:
Sparkle N Sprinkle products:
A Big Birthday Wish stamp set [00-931P8]
Violets for You stamp set [00-925P5]
Violets for You digi stamp set [DIGI4008FS]
Sparkle embossing powder [EP107]
Orange Marmalade embossing powder [EP323]
Cherry embossing powder [EP228]
Anti Static Bag [99512]
1/4" Tear-ific Tape [SAT01]

Other products:
Tonic 12" Advantage V Blade Trimmer [159e]
Tonic Tim Holtz Stamp Platform [1707e]
Tonic Tangerine machine [138e]
Tonic Hexagon Layering Basics Die Set [1521e]
Tonic Scalloped Circles Layering Basic Die Set [1455e]
Tonic Swirling Frame Layering Die Set [1462e]
Jewel Picker [91GR-C]
Versafine Onyx Black ink [VF-82]
Versamark ink [VM-001]
Sunset Serenade Diamond Hybrid Ink Pads [82N]
Nuvo Blue Babe Crystal Drops [693N]
Nuvo Red Berry Crystal Drops [667N]
Nuvo Deluxe Adhesive [200N]
Hai Diamonds Sequins [Q3-006]


I love embossing powder! To create the sentiment panel, I treated cardstock with the Anti Static Bag, then inserted the cardstock in the Tim Holtz Stamp Platform. I lined up my stamps, adhered them to the lid, and then inked them up with Versamark ink. I stamped them onto the panel, and sprinkled on embossing powder. I used Orange Marmalade for the "birthday" and Cherry for the "happy". I die cut the cardstock with Tonic's Swirling Frame Layering Die Set and then ink blended some purple ink onto the edges of the die cut, while the die was still on the paper - this creates a subtle white border! I then traced the die onto some solid cardstock and fussy cut it out. This gave me a slightly larger "frame" to layer behind the die cut panel.

I created the "dangles" too, for this mobile. I printed out some of the Violets for You digi papers, and then die cut them with Tonic's Hegazon Layering Basics Die Set, and layered them together (more on this below). I stamped out the butterflies, onto more of the Violets for You digi papers, with the Sunset Serenade Diamond Hybrid Inks, and then overstamped them with Versamark (using the Stamp Platform). I sprinkled on Sparkle embossing powder and heat set them. This gave the butterflies a bit of color, gloss, and sparkle! I layered them onto the "dangles" using Nuvo Deluxe Adhesive.

Here is another close up of the top of the mobile. I die cut a layer with black cardstock, using the Toni Swirling Frame Layering Die Set, and my Tonic Tangerine. I layered this under the sentiment panel, and placed all of these onto a repurposed chipboard tag. I punched holes in the top and strung some ribbon. I also stamped out some violets, like the butterflies noted above, and adhered them on the top and along the dangles too. I squeezed on some Nuvo Crystal Drops in Red Berry and Blue Babe. I also used my Jewel Picker to pick up and place some Hai Iridescent Diamonds onto the panel too. These are SO AWESOME!

And another image of it hanging. I used big and little dangles on the top and bottom and the butterflies and violets for the middle, for each line of dangles.

And finally ... here is how I created the dangles. I die cut five of the same sizes of hexagon for each "dangle" ball, from the Violets for You digi papers I printed out. I scored them down the center, and then folded them. I used Tear-ific tape, and placed it inside two opposite edges. I adhered five together to create the dangle ball. I fussy cut out the violets and butterflies, and adhered them to vellum circles I die cut using Tonic's Scalloped Circle Layering Basics Die Set. Here are all the dangles, before I started stringing them together.

Here is one of the balls, almost finished. I left one edge unadhered, until I wrapped it around the line to dangle it. I squeezed on a strip of Nuvo Deluxe Adhesive, inside the dangle ball to attach to the line inside. I peeled off the last bit of release paper and adhered the ball shut. This worked really well to hold the dangle ball onto the line.

This was a really fun project to make! I was really happy with how it came out, and I think I might have to do some more mobiles and other dimensional projects in the future! And, this A Big Birthday Wish stamp set is fantastic! I know I will use it a lot!

Thanks for stopping by. Have a magical day!

-Chris

Sparkle N Sprinkle compensated links are used when possible.
This blog post first appeared on Sparkle N Sprinkle's blog.

Sunday, December 2, 2018

Star Shaped Cards

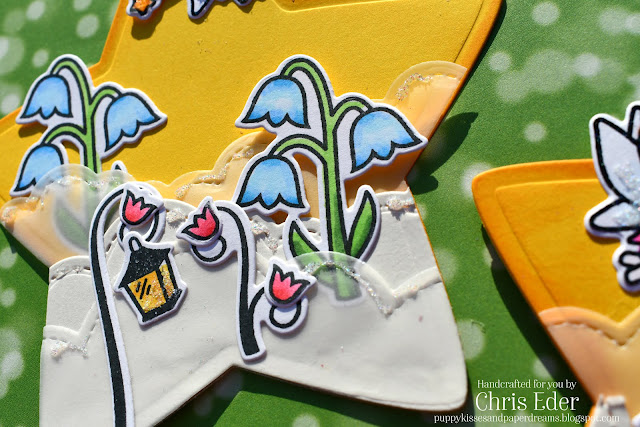
I made these star-shaped cards, perfect for the current Lawn Fawnatics Challenge 41 - Shaped Cards. Let's check out these cards!


I used Lawn Fawn's Fairy Friends stamp set. I stamped the images with my Tim Holtz Stamp Platform, and Memento Tuxedo Black ink, a Copic friendly ink. I colored my images with Copic markers, and then put them back into the Stamp Platform, and stamped them again with Versafine Onyx Black. I sprinkled on Sparkle N Sprinkle's Sparkle embossing powder and heat set it. This is one of my favorite ways of being able to color with Copics with a Copic friendly ink, and then ending up with a good solid black outline that is embossed! The key is the stamp positioner. Over-stamping is a breeze! I squeezed on some Dries Clear glue to a few strategic locations, like the wings, and sprinkled on some Sparkling Snow glitter from Sparkle N Sprinkle. I die cut some stars using Lawn Fawn's Puffy Star Stackables dies, using my Tonic Tangerine.

I also die cut out some clouds using Lawn Fawn's Puffy Cloud Borders from vellum and cream cardstock. I layered these all up, and squeezed on some more adhesive and sprinkled more glitter.

And, I used my NEW "made by" stamp that I purchased from Bossy Joscie Crafty Goods. I LOVE it! She does custom and personalized stamps, and a lot of other great things! She also created an electronic image for me that are on each photo. Thank you so much Joscie!!

I think these sweet Star shaped cards are so cute, and will look good adoring the gifties.

Thanks for stopping by. Have a magical day!

-Chris

Sparkle N Sprinkle compensated links are used when possible.
This blog post first appeared on Sparkle N Sprinkle's blog.

Bridge Fold Thanks Card

Hi! This card is a Thank You for our dog and house sitter. I did a Bridge Shape card, since the latest Lawn Fawnatics Challenge is Shaped Cards. I stamped out the house from Lawn Fawn's Happy Haunting, I stamped two pups and the tree from the Critters in the 'Burbs. Here is the card.

I wanted some dimension for the card, and found the bridge card design on the internets. I cut and scored my card base. I added in the patterned paper panels using Lawn Fawn's Knit Picky Fall Petite Paper Pack. I also die cut the green paper using the Grassy Border die. I also stamped out the thank you sentiment using the Grand Greetings (retired) stamp set and Versafine Black Onyx Ink. I sprinkled on Sparkle N Sprinkle's Sparkle embossing powder and heat set it. Then, I die cut it with Lawn Fawn's Everyday Sentiment Banners. Then, I layered the sentiment over a card panel strip, and attached it to the front of the card. This panel holds the card in the bridge shape.

And, this card can be flatted to mail and fits perfectly inside an envelope!

This was a fun card to make. I really like this shape and think I will do more in the future!

Thanks for stopping by. Have a magical day!

-Chris

Sparkle N Sprinkle compensated links are used when possible.
This blog post first appeared on Sparkle N Sprinkle's blog.